A few days ago, I penned down some customisation features that you can find on every Android phone. You can read more about it here, and in a nutshell, the guide should help you discover a bunch of ways to customise your droid without installing any third-party applications on it. That said, theming your phone using the built-in utilities is but the tip of the iceberg when it comes to Android customisation. So, in this article, I’ll walk you through some more interesting ways to change the look of your device. From custom launchers, to icon packs and unique widgets, I’ll try and cover all the bases so strap in – this will be a long one.
Related read: The ultimate guide to customising your Android smartphone part 1
Table of Contents
Custom Launchers
I’m sure most of you reading this article will be aware of Android launchers. On the off chance you have been living under a rock, an Android launcher allows you to completely change the looks of your phone by giving your home screen a total facelift. As an example, say you have a brand-new Redmi Note 10 Pro Max that runs the company’s MIUI v12. Now, despite MIUI’s wealth of customisation features, you will be somewhat limited in how you can tweak your phone’s home screen. Sure, you can change the icon pack, or even flip between different home screen transition effects. But a custom launcher will allow you to get more nitty-gritty with your selections.
Nova Launcher
First things first, Nova launcher is available as a free app on the Play Store, but opting for Nova Prime will grant you more customisation tweaks. Thankfully, Nova Prime isn’t all that expensive and you can often find the utility discounted on the Play Store. Regardless, once you’ve downloaded Nova Launcher, you’ll have to set it as your default launcher. To do so, simply head over to your phone’s settings menu and search for ‘default apps’. From here, you should find a prompt to select your default home screen launcher.
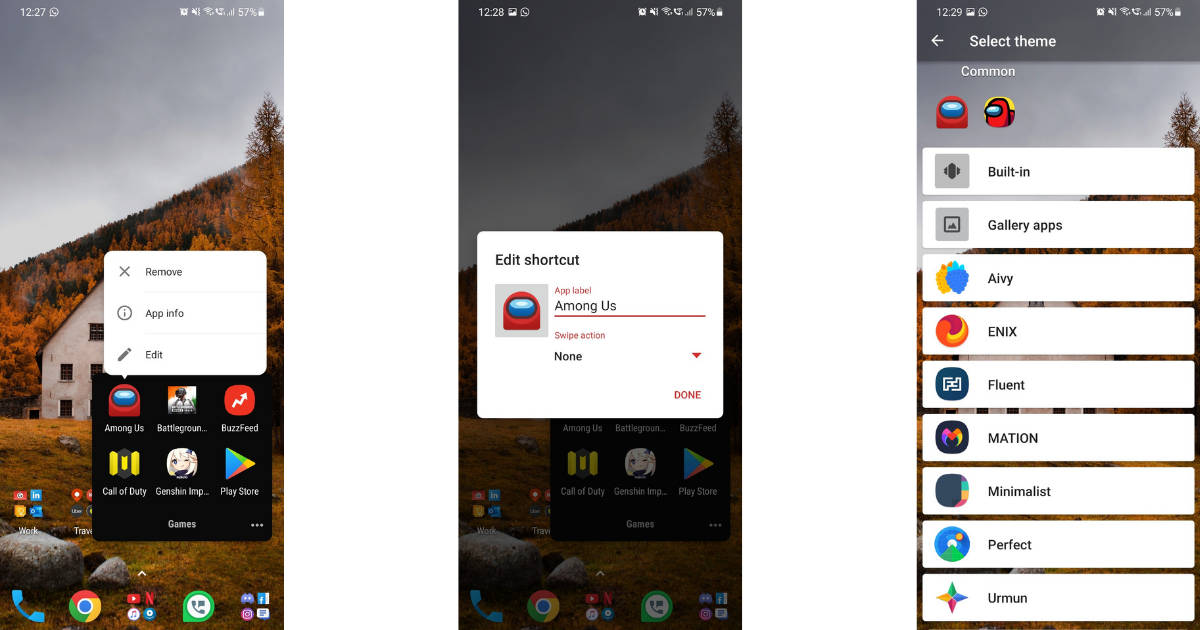
With that out of the way, let’s take a look at what you can do with the Nova launcher. Firstly, Nova launcher allows you to use a ton of incredible icon packs. To do so, you can simply download an icon pack of your liking from the Play Store, open it, and from there, you should see an option to use it for your preferred launcher. That’s not all, as you can even choose icons from different packs and apply them to your home screen setup. How, you might ask? Well, simply long-press any icon on your home screen and tap the ‘edit’ button when prompted.
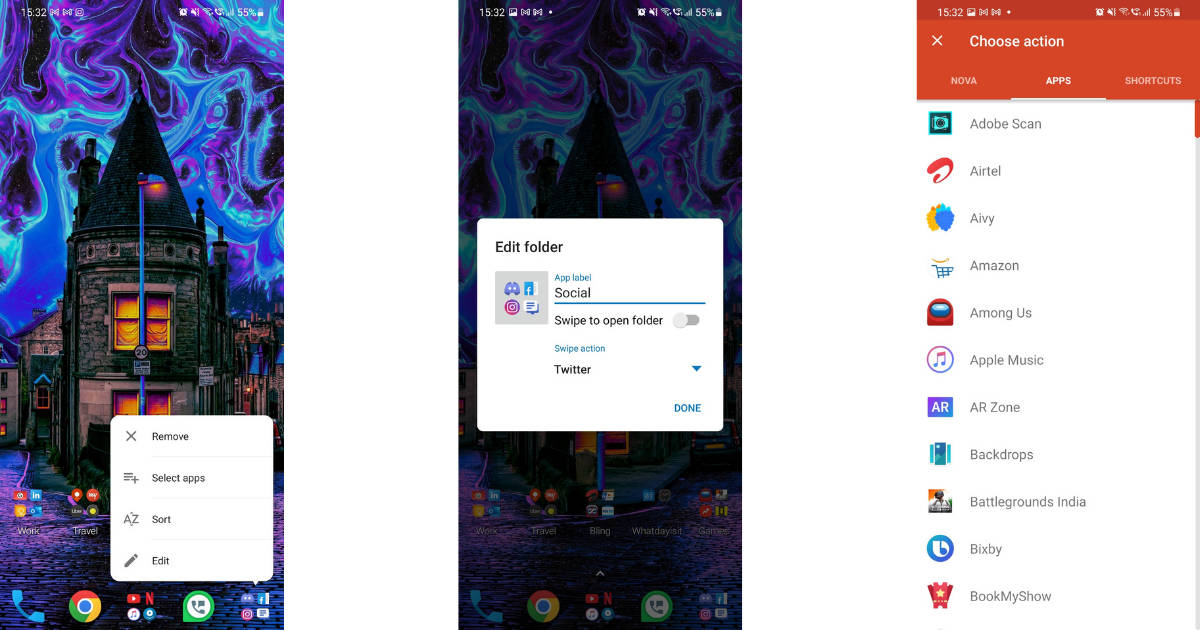
From here, just click on the icon’s image and the launcher will automatically bring up a list of all the icon packs installed on your phone. You can tap on any icon pack and select the desired icon to replace the one on your home screen. The best part is that you are not locked into choosing an icon relevant to the app. So, if for some reason, you want the Among Us icon to look like a phone dialler, you can do that – the world is your oyster.
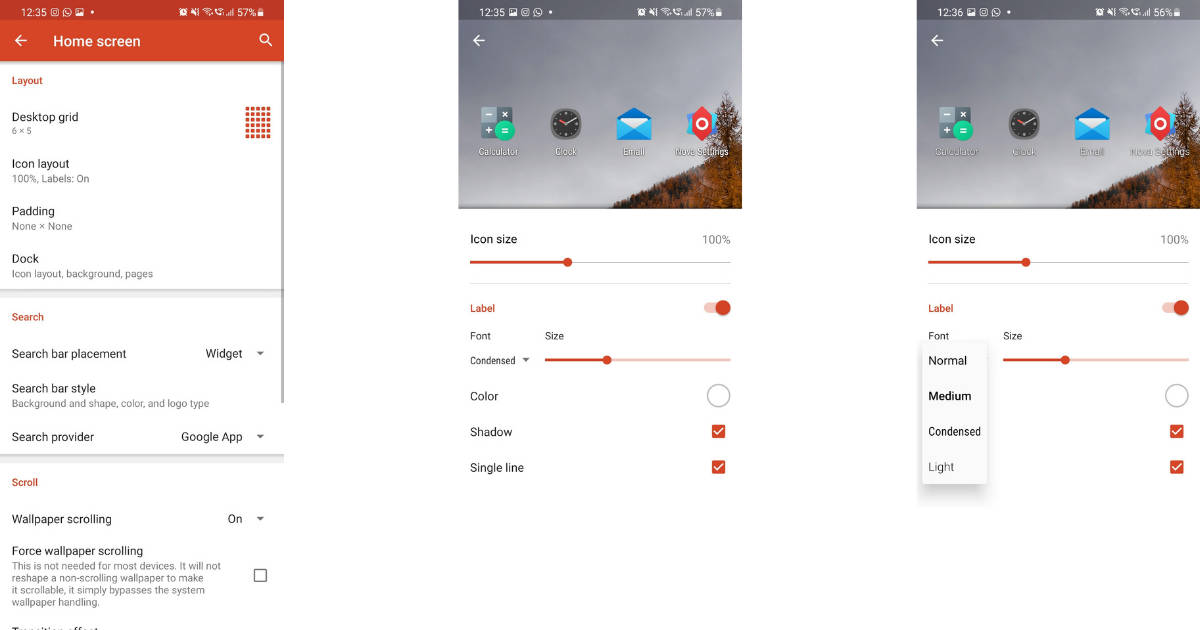
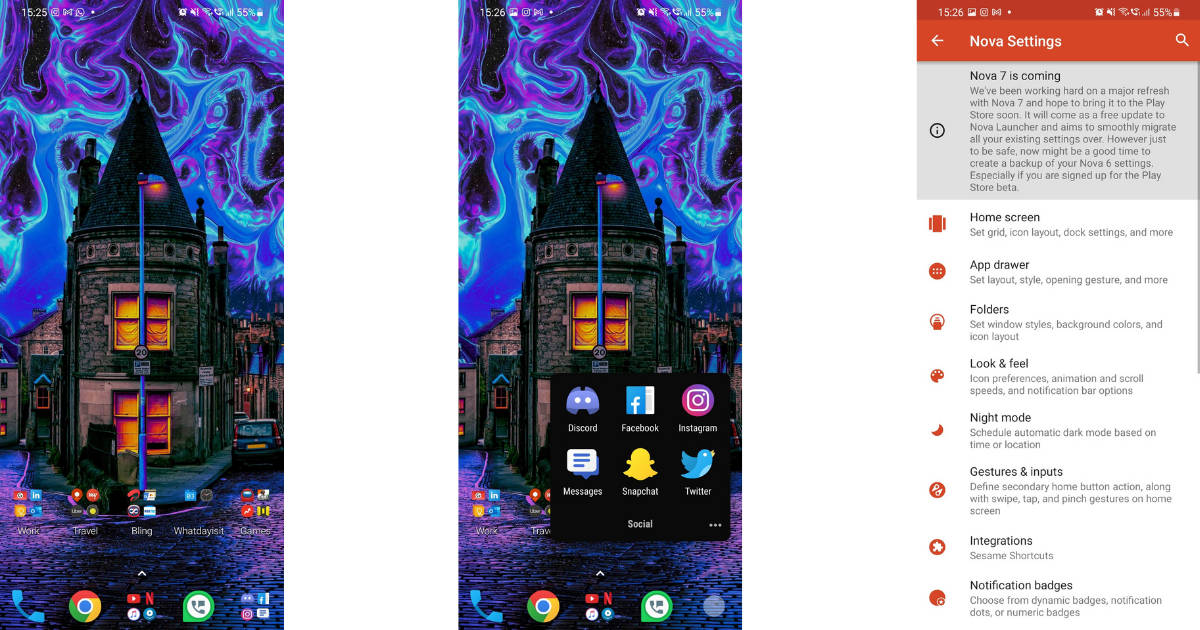
You can also change the way icons appear on your home screen. So, be it changing the icon size, variating the icon labels by using a different font style, or completely removing it altogether, Nova, as well as most other launchers should be able to do that too. The same goes for folders as well, and with Nova, you can easily change the shape of a folder, or make it completely transparent too. For that, you’ll have to go into the launcher settings once again, and tap the sub-head dubbed ‘Folder’. Once there, you can head over to the ‘Folder appearance’ tab and increase the folder transparency to 100 percent. In doing so, you’ll remove any folder outline and will only see apps clubbed together on the home screen.
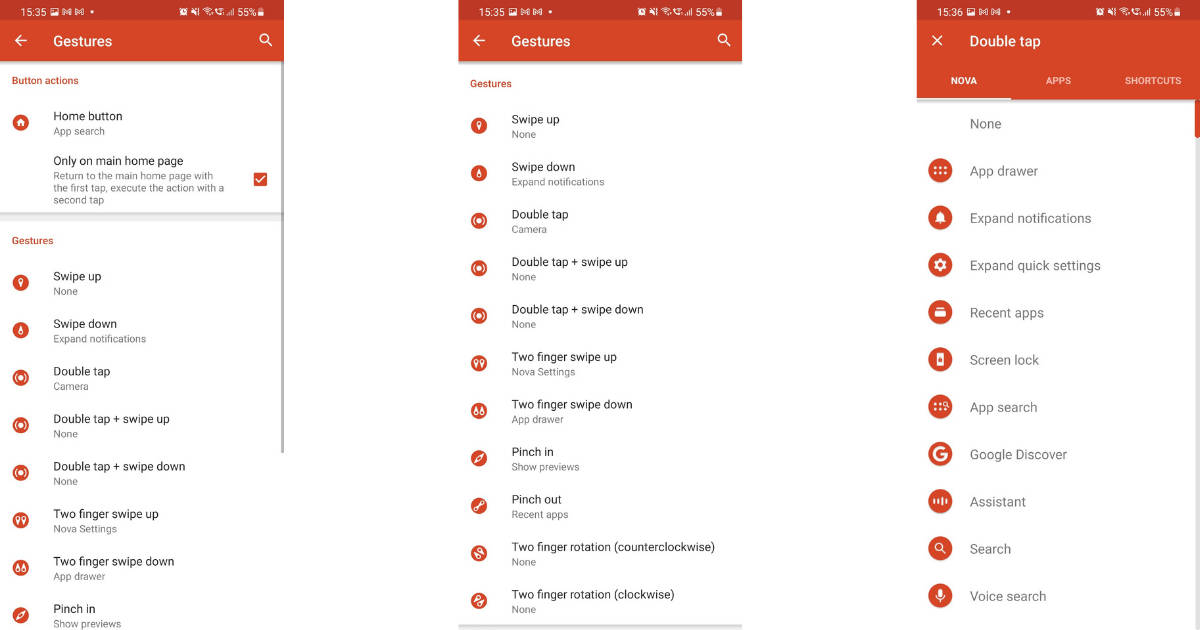
Now, if like me, you caved in and downloaded Nova Prime, then you’re in for a treat as you can even add gesture-based commands to each and every icon and folders on your home screen. To do so, just long-press the icon or the folder and tap the edit button. From here, you will see a prompt to change the ‘swipe action’, which can be anything from invoking a system shortcut or launching an app on your phone. I have the same set up on my social folder, which comprises apps like Twitter, Snapchat, and Instagram. Now, seeing how I frequent Twitter the most, I can just swipe up on the folder and launch the app directly, which saves me a step or two in the process.
Other launchers
Quite frankly, I have barely scratched the surface here and it’s impossible to list down all the features of Nova launcher, let alone other custom launchers. Rest assured, you’ll routinely discover new features as you get around to using a custom launcher. And, those looking to experiment beyond Nova should try Microsoft Launcher, which is a productivity-focussed custom launcher that puts your task lists front and centre. You can also look into Niagara launcher, which puts emphasis on ergonomics and is tailor-made for phones with large screens. Come to think of it, that should apply to most modern Android handsets. Regardless, Niagara launcher brings a wealth of unique features so, do give it a shot as well. Lest I forget, there are a plethora of funky custom launchers available on the play store too, including Windows 98 simulator which will revamp your home screen to resemble a Win 98 PC, or Launcher 15 iOS which as its moniker suggests, will transform your Android device’s home screen UI to match that of Apple’s iPhones.
Best Icon Packs
Icon packs allow you to spruce up your home screen without much hassle. What’s more, you’ll find no shortage of icon packs on the Play Store either – the market is literally littered with thousands of icon packs for you to choose from. Of course, there are some that look nicer than others so, let’s take a look at some of the best free and paid icon packs, shall we?
Free icon packs
Let’s kick things off with my top five free icon packs on the Play Store. I’ve tried to incorporate different styles of icon packs to cater to a wider audience but, on the off chance, you find an icon pack that should’ve made this list, do let me know in the comments below.
1 – Viral icon pack – If you want an icon pack to compliment your phone’s dark theme, then you’ll absolutely love the Viral Icon pack. In fact, you should also check out other icon packs by DrumDestroyer Themes – they’re among the best in the biz.
![]()
3 – Minty icons – With distinctive outlines and peppy colours, the Minty Icon pack will undoubtedly stand out in your home screen setup.
![]()
4 – Glim icon pack – The glim icon pack has been around for a while and it was among the first icon packs I downloaded on my Android phone. Users opting for the set will be greeted with flat, material-style icons that will look good on any home screen setup.
5 – Moonrise icon pack – Much like Viral icon pack, Moonrise also plays on a dark theme and will complement most setups well.
Paid icon packs
Themers with an itch to get the best of the best will find their money’s worth with a slew of paid icon packs too. I’ve listed some of my favourites below, so take a gander –
1 – Minimalist icon pack – As its moniker suggests, Minimalist icon pack offers a treasure trove of beautifully designed, minimal-looking icons with a pastel hue. What’s more, the icon pack offers over 6,300 icons so, rest assured, it should cover a good chunk of apps on your phone.
2 – Diligent icon pack – Diligent icon pack ships with over 2,100, uniquely stylised shapeless icons. What’s more, you also get a bunch of really nice wallpapers in the icon pack too.
3 – Crispy icon pack – Crispy icon pack offers a bunch of quirky-looking icons with vibrant colours which go well with pretty much any backdrop.
4 – Mellow Dark icon pack – Mellow Dark is a dark-themed icon pack that, to me, comes across as an amalgamation of Glim icon pack and Moonrise icon pack. If you plan on using a lot of gloomy wallpapers, then do give this a shot.
5 – Fluent icon pack – I recently stumbled across the Fluent icon pack which, per the developer, is based on the Fluent design guidelines by Microsoft. While a bit on the pricier side, the icon pack comprises really stunning icons with soft shadows.
Best Wallpaper apps
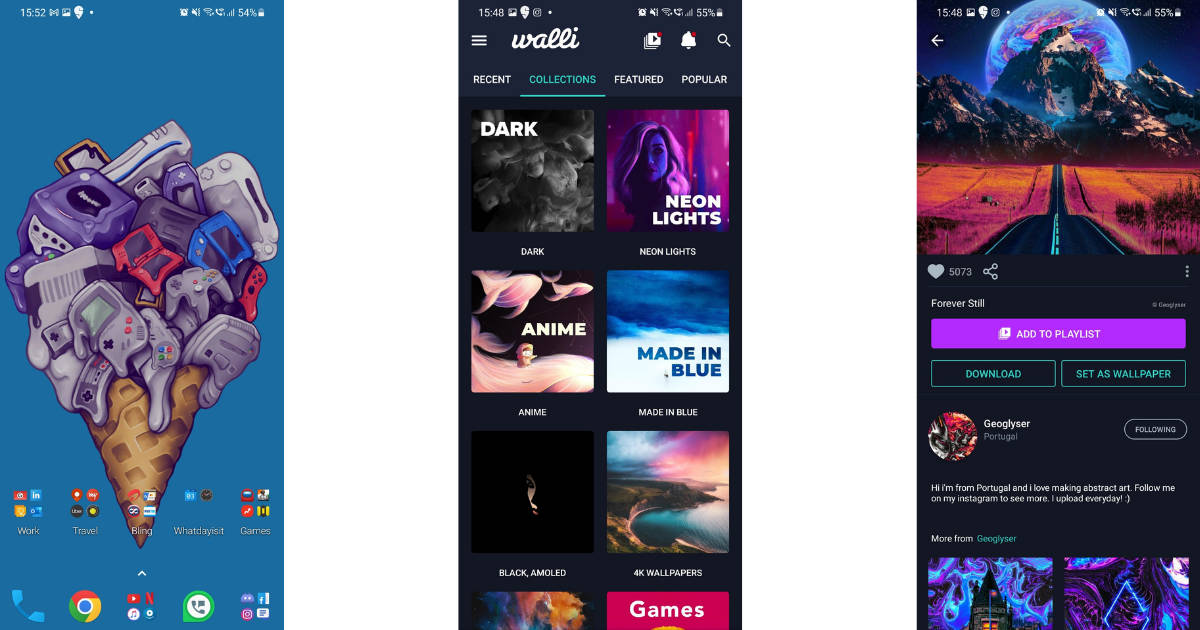
Okay, now that you have your home screen set up the way you like, it’s time to add a nice wallpaper to round things up. There are a plethora of wallpaper apps available on the play store, but I routinely check for walls on Walli, Backdrops, and off late, Wallsy too. While you can download Walli and Backdrops for free (Backdrops does have a premium tier, BTW), you will have to pay for Wallsy. Still, all these apps offer a ton of different wallpapers curated across different categories. So, be it the best wallpapers for AMOLED display phones, or say, wallpapers with an abstract or lo-fi theme, there’s something for everyone here.
Custom widgets
While most customisation elements are merely there for show and aesthetics, widgets bring the best of both, form and function to your home screens. So much so, even Apple couldn’t resist announcing widgets for iOS 14. But, I digress. You see, Android widgets offer a wealth of customisability, but there are utilities that can amplify that experience tenfold. I am, of course, talking about custom widget-making apps like KWGT. For the uninitiated, KWGT lends themers granular control over their widgets. And, trust me, KWGT will send you down a rabbit hole of customisation that involves tweaking every aspect of a widget – be it the font of the text, the shape of the widget, or even the spacing between the elements.
What’s more, while you can make a really intricate widget all by yourself, you also have the option of just downloading widget packs to use from the Play Store too. That said, you will have to opt for KWGT Pro to import custom packs, and if you are into theming your phone, then I would highly recommend investing in the premium version of the app.
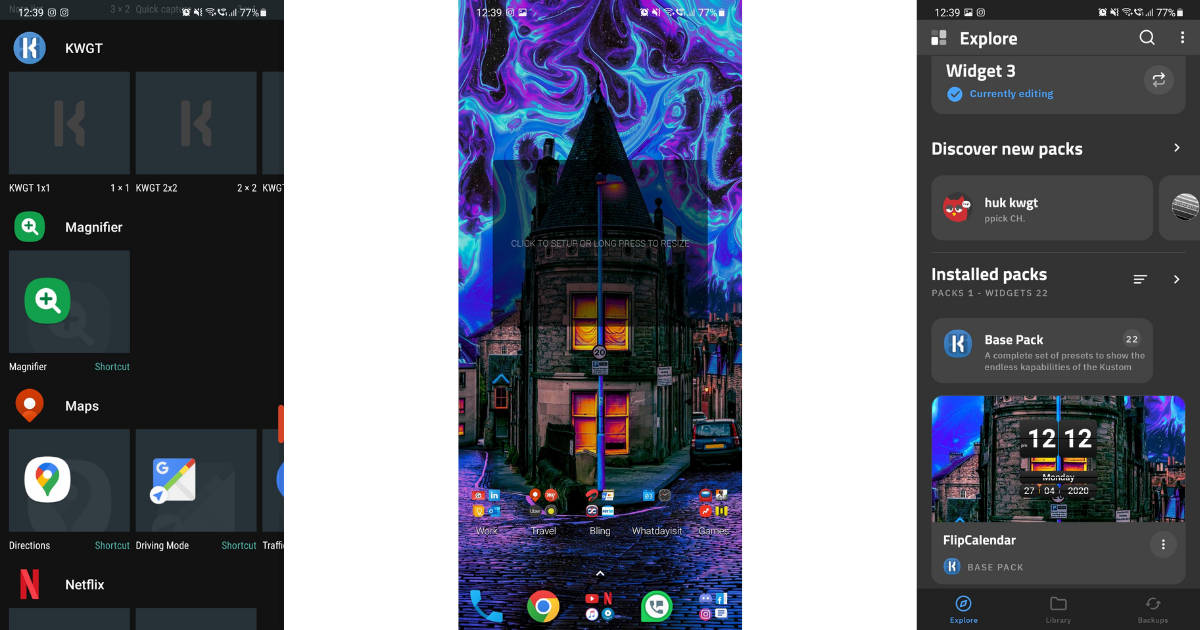
Now, there’s a lot that goes behind creating a custom widget so, what I like to do is sift through a bunch of templates and then finetune the one that I like the most. As an example, I recently downloaded the Vanilla KWGT pack from the Play Store which comprises hundreds of incredible templates. Once downloaded, the widget pack will automatically come up on the KWGT app. But, before you can work on a widget, you’ll have to position a blank template on the home screen. To do so, simply long-press on the home screen, go into the widgets sub-menu, and from there, select a blank KWGT template of your preferred size. From there, tap on the widget and select a template from any widget packs you’ve downloaded on your phone.
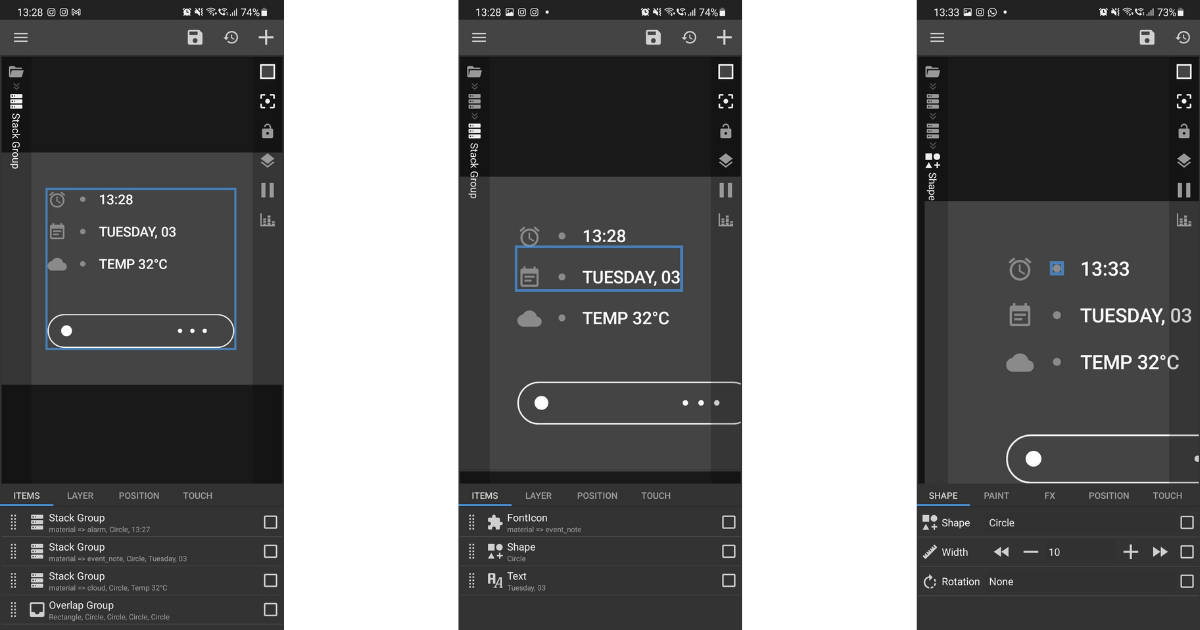
Now comes the interesting bit. See, KWGT can be a tad overwhelming for first-timers but fret not – I’ll try my best to wrap your head around the basics. So, much like a photo-editing app like say, Photoshop, all the elements of a KWGT widget are neatly laid out in layers. For instance, if you select the ‘Items’ tab, then from here, you can see that tapping on different stack groups highlights different elements of the widget. You can then tweak these elements further by tapping on them once again.
As an example, in the screenshots attached above, selecting the first stack group highlights the ‘clock’ bit of the widget. From here, I can change the icon of the clock that’ll show up in the final template, along with the text and the shape of the dot separating the image of the clock from the time too. I can also change the font of the text used to denote the time, as well as add other bits of information by keying in formulas too. Now, bear in mind that any text or information that shows up on a KWGT widget can be manipulated by going into the ‘Text’ layer.
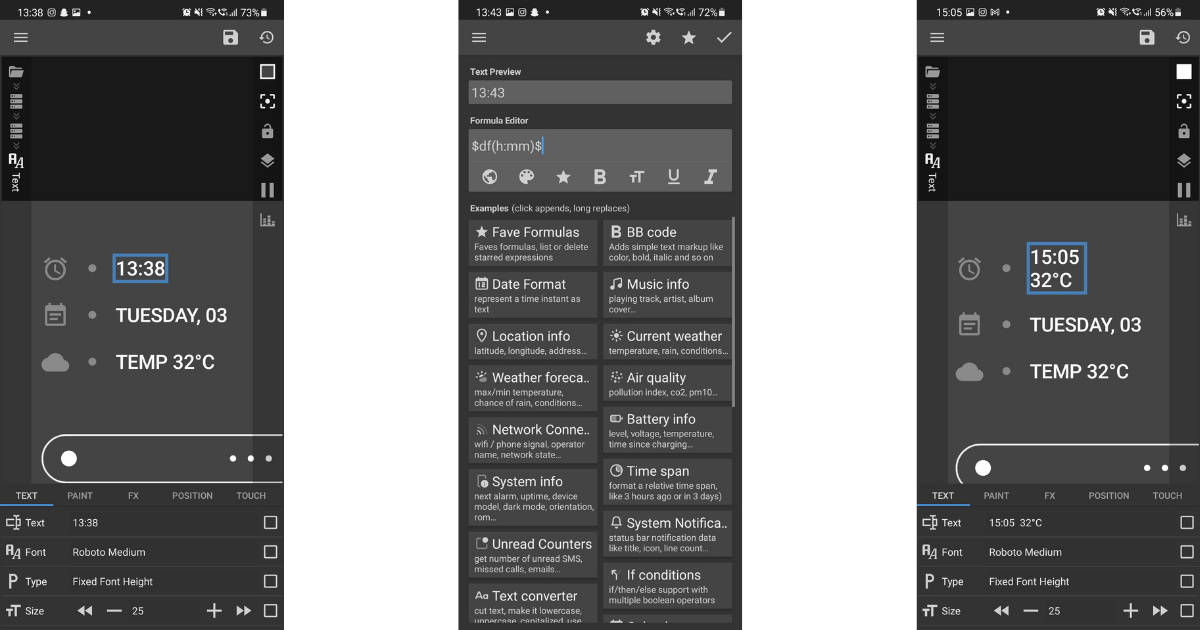
So, for instance, if I want the widget to show the current temperature alongside the time, then I can do so by going into the Text layer and choosing the appropriate formula. Note that every formula will have a bunch of different iterations, so choose the one you like the best. Moving on, under the layer sub-head, you can make changes to the widget as one entity. So, if you want to increase or decrease the size of the widget, then you should key in a number in the ‘scale’ bracket. Furthermore, the ‘Touch’ sub-head controls what happens when you tap on the widget. By default, most KWGT widgets will open the widget editor, however, you can assign the widget to invoke a multitude of different system functions.
It goes without saying that KWGT involves a learning curve and the utility might not be everyone’s cup of tea. On the flip side, the Play Store is flush with slick widgets for KWGT, so you can just use the one you like from there.
Suffice it to say, with a couple of tools, you can make your Android truly stand out. Do let me know in the comments below what are some of your favourite customisation apps and stay tuned for more tech coverage on our blog.


")


