
In case your internet is acting up despite being online, chances are your DNS needs a fix. DNS, which stands for Domain Name System, is one of the central and most critical parts of the internet infrastructure. It is like a dictionary or a phonebook, which keeps records of all the IP addresses of the world’s websites. Every machine connected to the internet has an IP address assigned to it, even your PC and smartphone. Since machines do not understand what a domain name is, it is the IP address that enables your devices to find and connect to different websites such as Google.com. With that being said, let’s find out how exactly the DNS servers work and how to change it on your Android mobile phone, iPhone, and laptop/ PC to improve the web experience.


Table of Contents
What is DNS?
As explained above DNS is short for “Domain Name System”. When you connect to the internet, one of the first things that your computer does is to call the default DNS server. Most of the time this default DNS server is provided by your internet service provider (ISP) or the telecom operator you’re using. Whenever you enter something into your web browser’s address bar, the PC calls the DNS server of your ISP and requests it to provide the IP address for the target website. For instance, when you type “Google.com” into your browser’s URL Address Bar, the browser calls the default DNS server of the ISP, which then scans through its database and provides the assigned IP address for Google.com that looks something like this: 183.123.93.92. Each time you visit a website this process is repeated.
Behind the scenes, all computers work on IP addresses to connect and communicate with each other. Now that you know a little about DNS, here’s why you should change it:
Why should you change DNS?
DNS is one of the crucial infrastructures of the web and any issues with it mean your internet experience will be critically affected. When it comes to DNS servers, you have a choice. You don’t have to rely on the default ISP servers, which might be slow or don’t properly work sometimes due to misconfigured servers. That said, you can change the default DNS server using one of the available third-party DNS servers. Changing the DNS server can bring several improvements to your internet experience, including possible speed and reliability improvements, boost security and privacy, and even let you do things like ad-blocking and content filtering. You can choose to change the DNS server for your entire home network or your individual devices such as an Android device, tablet, laptop, Mac, iPhone, iPad, and more. Below are some of the benefits that third-party DNS services bring.
Improved speed and reliability
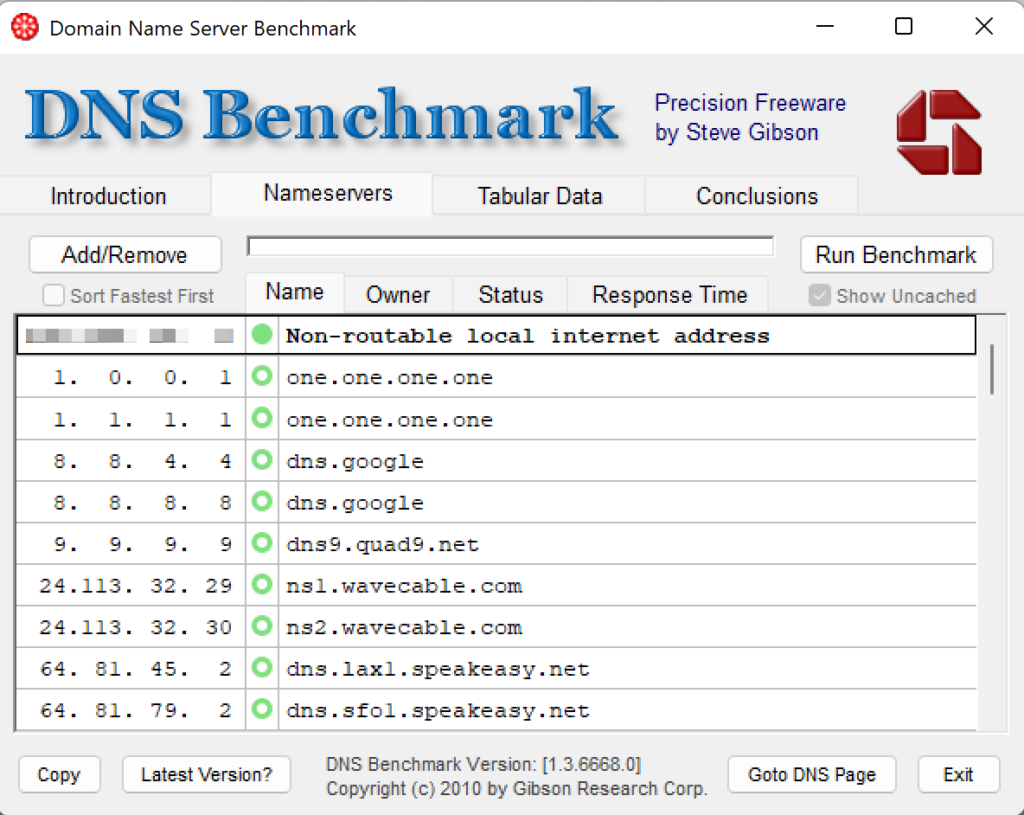
If your ISP’s DNS servers slow, your entire internet speed will be affected. Third-party DNS servers are often faster and more reliable depending on the server locations. You can check your current DNS server’s latency to check if you need to switch to a different DNS server. On Android smartphones, this can be done via several third-party apps available on the Play Store, and on Mac and Windows, this can be done using the popular DNS benchmark program NameBench or Gibson Research Corporation’s Domain Name Speed Benchmark tool. If you find that your ISPs are slow, you can switch to a DSN server provider that is providing better speeds and latencies for improved internet speed and reliability.
Improved privacy and security
One of the other things that third-party DNS server providers are good at offering is improved privacy and security. Modern DNS servers use newer technologies and improved DNS protocols such as DNS-over-HTTPS, DNS-over-TLS, and even the much recent DNS-over-QUIC protocol, which your ISP may not be using. This is what enables third-party DNS providers to offer enhanced privacy and security while browsing the web.
Attackers use methods such as DNS cache poisoning to breach user privacy, where the hacker corrupts the DNS cache of the target DNS server, leading to phishing attacks and thus, compromising user security. DNS cache poisoning is a method where the hacker replaces genuine website IP addresses with fraudulent IP addresses on the DNS server. The hacker then uses these fake DNS entries to route the web traffic to their intended website, thus making users fall for malicious websites designed to trick users into giving away critical personal information such as usernames, passwords, credit card and other bank details, and more. Using a sophisticated DNS server with improved security protocols will offer better security from these types of attacks. Moreover, some DNS providers such as AdGuard DNS and OpenDNS even provide content blocking services such as adblocking, parental controls, and even phishing protection on top of the basic DNS resolver services.
Ad-blocking and parental controls
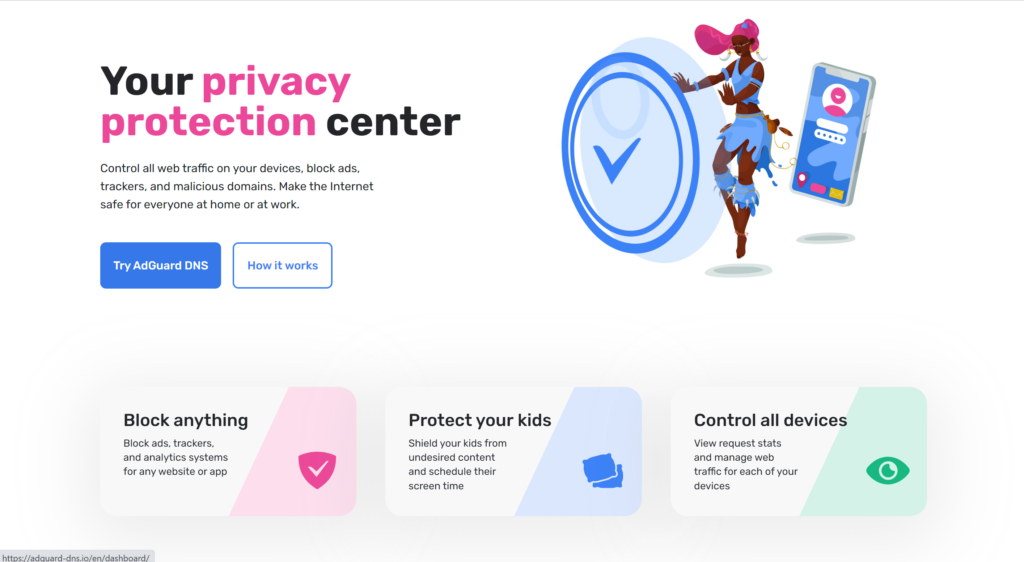
The way the DNS works allows DNS providers to easily block certain domains such as ad servers. Some DNS providers such as AdGuard and OpenDNS specialise in proving end-user services such as adblocking and parental controls. For instance, AdGuard’s DNS servers block advertisements of all kinds by default including trackers as well as malicious domains. AdGuard’s DNS service also allows you to easily add block lists of your choices to further enhance the adblocking experience. OpenDNS and NextDNS are some other DNS providers that provide content blocking services.
Phishing Protection
Phishing is one of the popular methods malicious actors use to trick users into revealing personal information such as usernames, passwords, bank details, and other personally identifiable information. With millions of websites out there on the internet, and hundreds of thousands added to the web daily, it is to hard spot which domains are malicious and designed to deceive users. Opting for DNS servers such as OpenDNS or AdGuard DNS that automatically filter out these harmful websites ensure you’re better protected from these sort of attacks.
How to Change your DNS server
Changing your DNS might seem like a challenging task. But with the proper steps and tools, this can be done quite easily. We have also listed down some of the best DNS server providers at the end of the article so you can quickly get started. That said, here is how you change your DNS on different platforms:
On Android
Google has made it quite easy to change DNS on Android. Android 9 and above comes with a DNS-over-TLS functionality that makes it easy to set up a DNS server of your choice, provided the DNS server supports DNS-over-TLS protocol. DNS servers such as GoogleDNS, Cloudflare DNS, and Adguard DNS support DNS-over-TLS, for instance.
How to setup DNS server using DNS-over-TLS on Android 9 and above
Setting DNS on the particular Android skin such as from Mi, Realme, or OnePlus might differ depending on the OS and skin version. But usually, these settings are found in Network and internet settings. Here is how you can change the DNS server on Android 9 and above.

- Open System settings
- Go to Connection and sharing
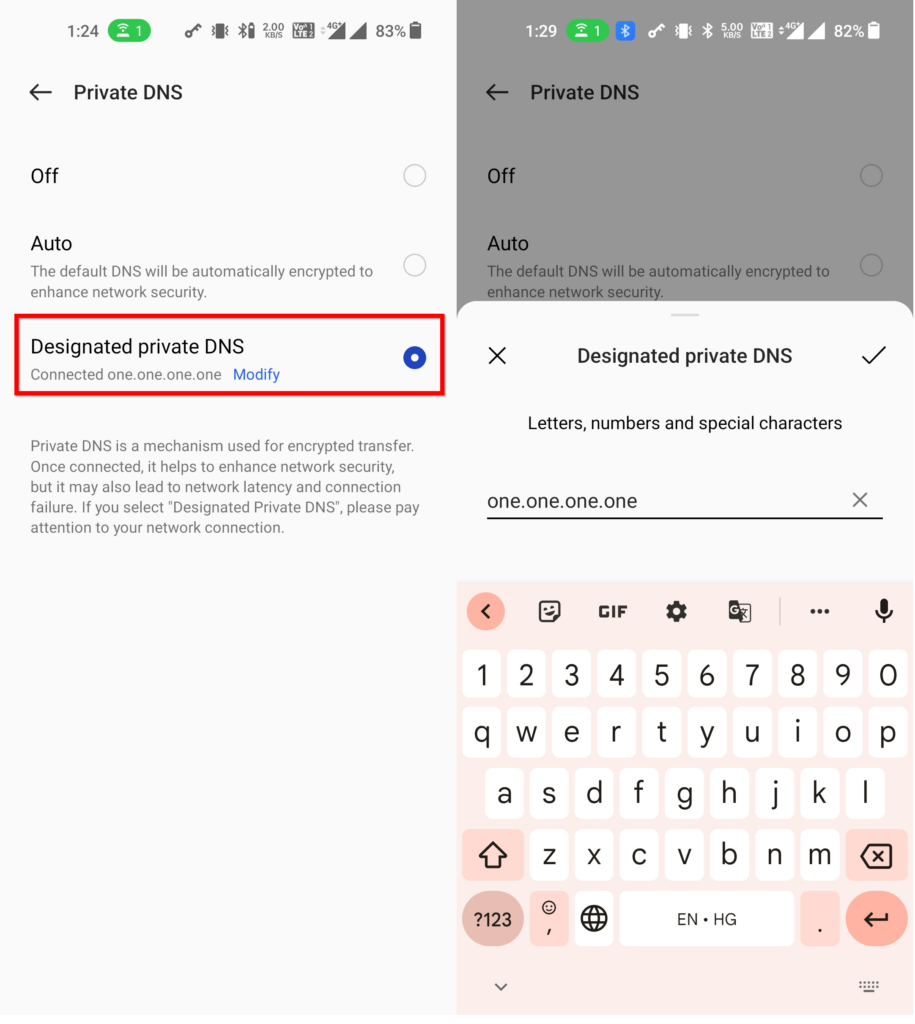
- Click on Private DNS
![]()
- Select Designated private DNS
- Enter the DNS-over-TLS IP address of the DNS service provider such as one.one.one.one
How to setup DNS-over-HTTPS on Android 8 and below
The easiest way to set up third-party a DNS server on Android 8 and below is to use an app like DNS Changer or a similar app from the Play Store. However, these apps use local VPNs to set up the DNS servers, which take up the VPN slot and the apps will stop working if you use an actual VPN. If you’re ok with this method, this is the most straightforward way you can change the DNS on Android devices. Otherwise, you have the option to set up the DNS server using the Wi-Fi network. Before we get started, most DNS-over-HTTPS DNS servers have two DNS IP addresses: one for IPv4 and another for IPv6. Note that whenever provided with the IPv6 option, you can enter both IPv4 as well as IPv6 addresses into the respective places. Here’s how you can set up a DNS on your preferred Wi-Fi network on Android devices.
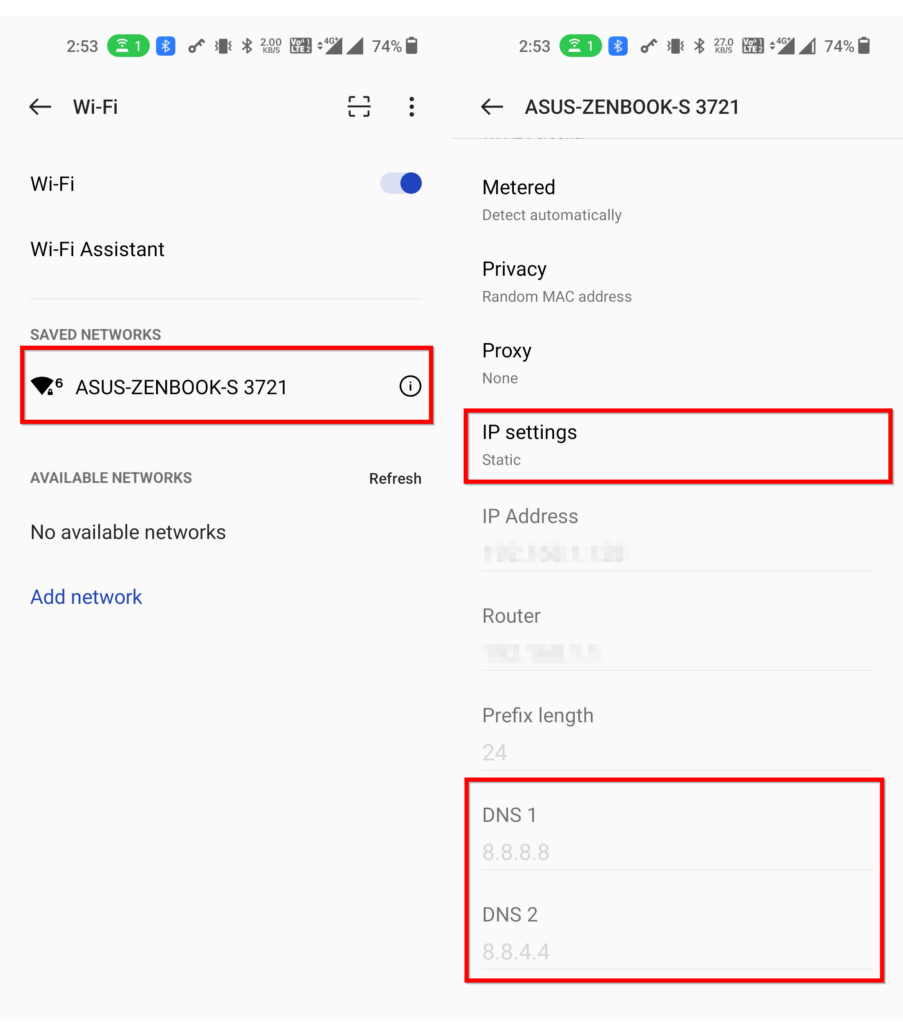
- Go to Wi-Fi settings of the connected network (you may have to click the ‘i‘ button beside the network name on some devices for Wi-Fi settings)
- Click on IP address settings
- Change the IP settings to Static
- Enter the DNS-over-HTTPS IP address of the DNS server such as 8.8.8.8 and/or 8.8.4.4 for IPv4 and 2001:4860:4860::8888 and/or 2001:4860:4860::8844 for IPv6
On iOS
To set up third-party DNS on iOS follow the below steps:
- Go to Settings
- Go to Wi-FI settings
- Click the ‘i‘ button next to the connected
- Press Configure DNS option under the DNS settings section
- Change the settings from Automatic to Manual
- Tap the red minus sign to delete the existing addresses
- Click Add Server and enter the DNS IP address, and repeat the process for adding a secondary DNS server
- You need to DNS-over-HTTPS IP address of the DNS server such as 8.8.8.8 and/or 8.8.4.4 for IPv4 and 2001:4860:4860::8888 and/or 2001:4860:4860::8844 for IPv6
On Windows
On Windows, you have to change the network properties of the connected network to add a third-party DNS server. Here’s how it’s done:
How to change DNS on Windows 10 and below
- Go to the Control Panel > Network and Internet > Network and Sharing Center
![]()
- Click Change adapter settings
![]()
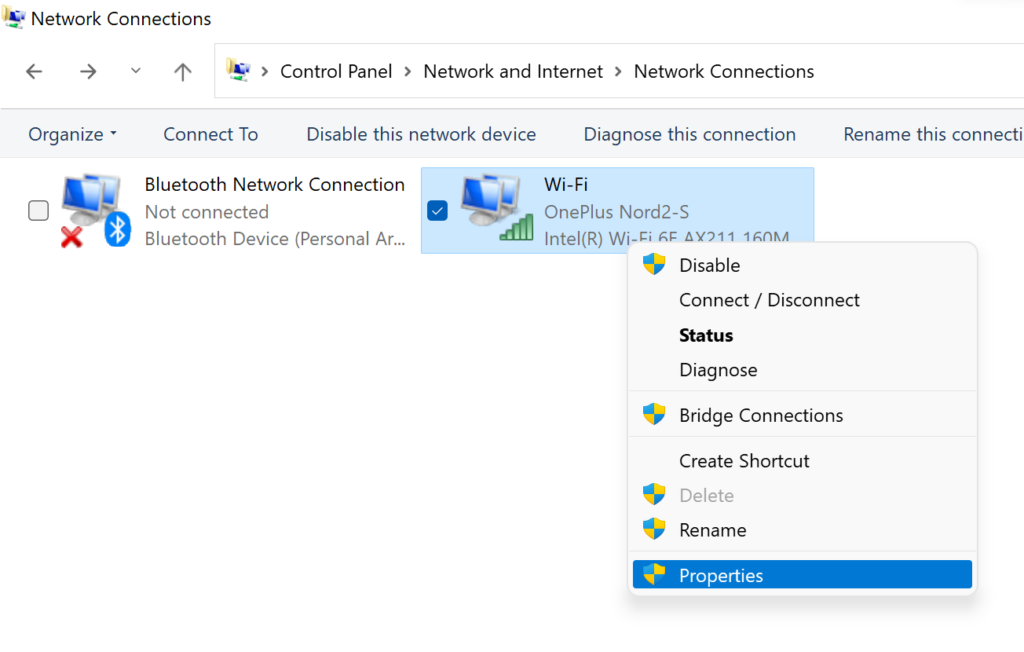
- Right-click on the network you want to add the DNS IP address to and click Properties
![]()
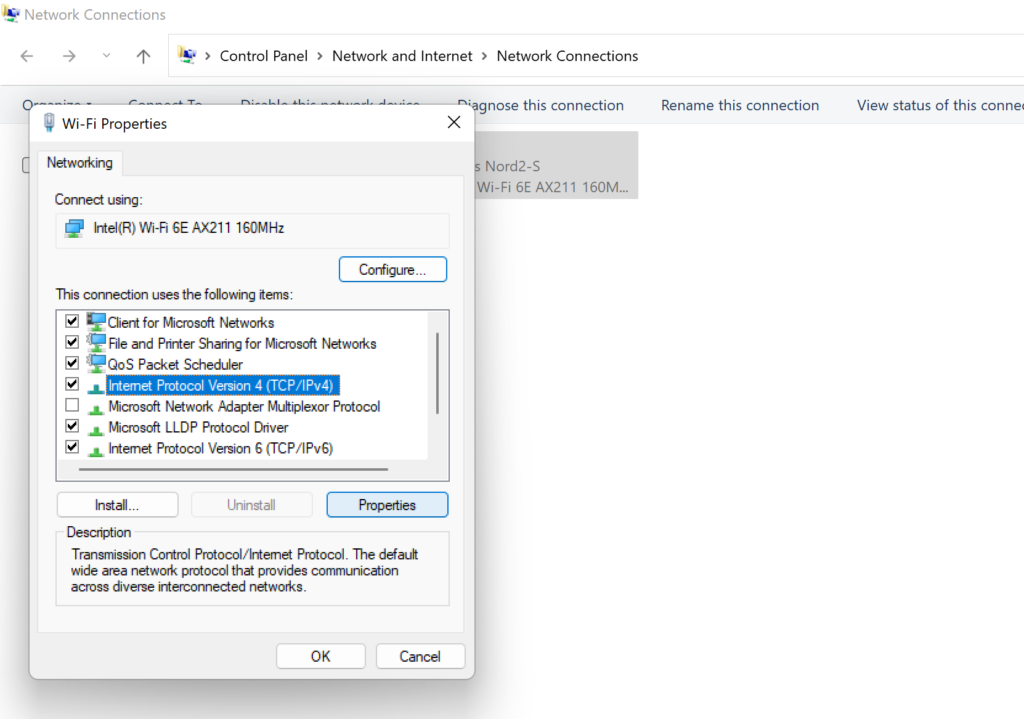
- In the resulting pop-up, scroll down and select Internet Protocol Version (TCP/IPv4)
![]()
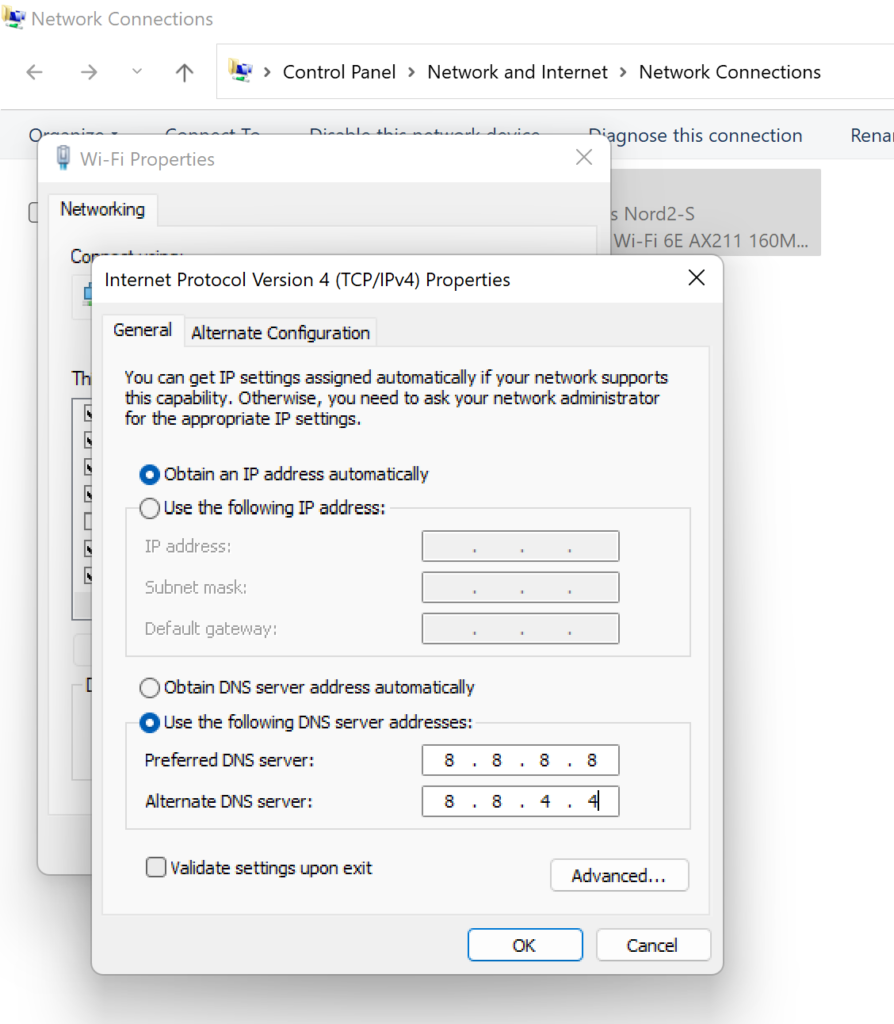
- Now select Use the following DNS server addresses
- Enter the IPv4 IP of the target DNS address such as 8.8.8.8 and/or 8.8.4.4
- Follow the same process and select Internet Protocol Version (TCP/IPv6) in the Wi-Fi properties tab for adding IPv6 addresses.

How to change DNS on Windows 11
On Windows 11, Microsoft has offered another way to change the DNS. If you have Windows 11 installed, this is the easiest way.
- Open the Quick Actions menu from the System Tray and click the arrow button beside the Wi-Fi network name
![]()
- Click the ‘i‘ button
![]()
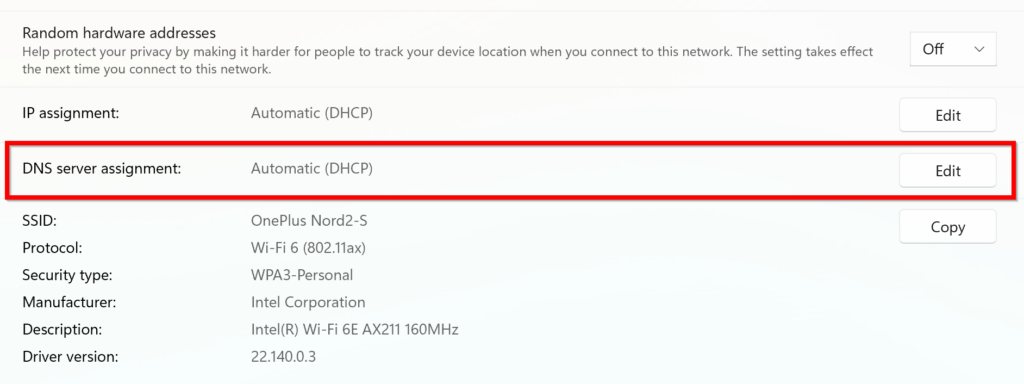
- Scroll down and click the Edit button in DNS server assignment
![]()
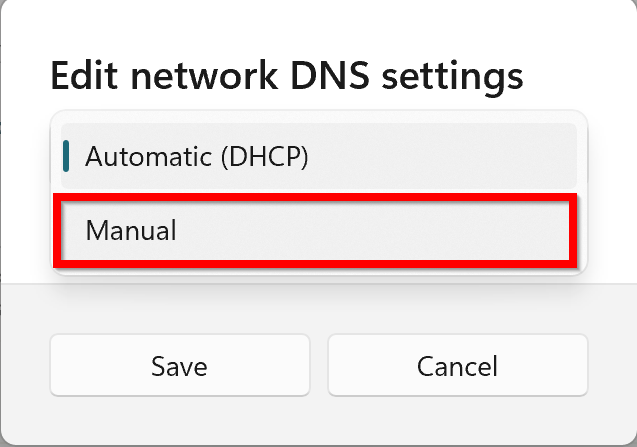
- Select Manual
![]()
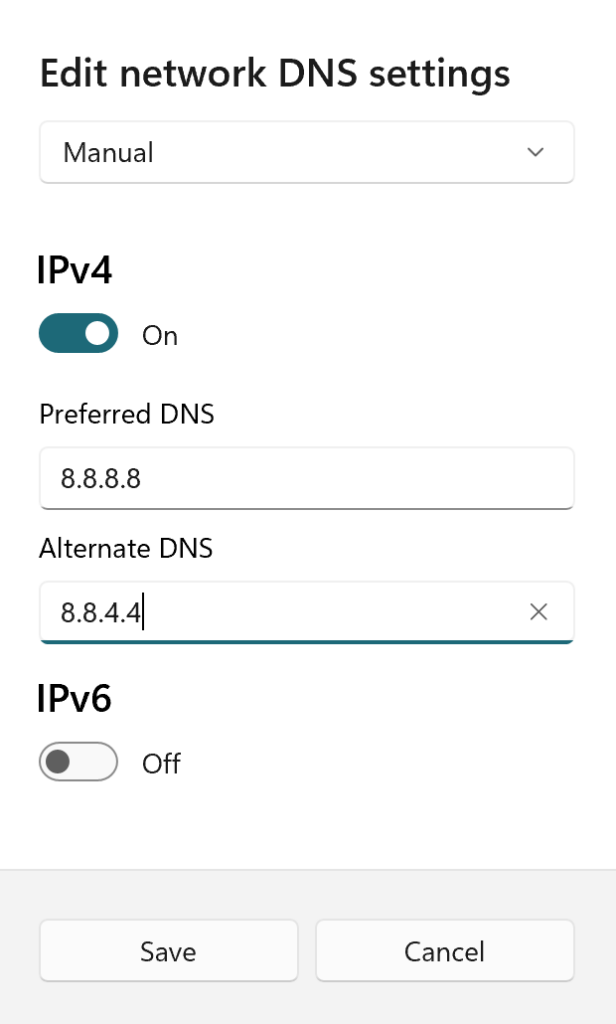
- Enable IPv4 switch and Enter the IPv4 address of the DNS server such as 8.8.8.8 and/or 8.8.4.4
- Do the same for IPv6

On a Mac
Follow the below steps to change the DNS server on a Mac.
- Open Apple menu
- Select System Preferences
- Click Network
- Select the preferred network
- Click Advanced
- Click DNS
- In the resulting window click the “+” and enter IPv4 or IPv6 DNS IP server addresses
- Click “OK” when done and click Apply to save the settings
On Routers
If you want your entire network to use the same DNS IP address, changing the DNS servers on a router is the best way. Once you change the DNS on a router, all your connected devices such as smartphones, tablets, TVs, laptops, and any other devices will automatically use that address.
- Enter the local IP address of the router (most router manufacturers use addresses such as 192.168.0.1 or 192.168.1.1) in the web browser to access its web interface. The local IP address of the router is usually mentioned in the router’s guide or on the back of it or look for the gateway settings in the network connection on your PC.
- Go to DNS server option
- Look for LAN or DHCP setup
- Enter the IP address of the desired DNS servers
Best DNS services
In the example above we have used Google Public DNS and Cloudflare servers as examples. There are several other DNS providers that you can use to enhance your browsing experience. Below is a list of some of the best DNS providers and their DNS server IP addresses:
Cloudflare DNS
You have probably heard of the tech behemoth Cloudflare. The company provides one of the most popular and widely used global content delivery networks (CDN). And it has an excellent DNS resolver service that end users can use. The Cloudflare DNS specialises in providing security and privacy to users. If you want performance, privacy and security, and reliability, Cloudflare DNS is one of the go-to choices. Below are the IP addresses for the Cloudflare DNS servers.
- IPv4 address: 1.1.1.1 and 1.0.0.1
- IPv6 address: 2606:4700:4700::1111 and2606:4700:4700::1001
- DNS-over-TLS address: one.one.one.one
Google Public DNS
If you want a no-fuss DNS resolver service, Google Public DNS is another choice. And just like Cloudflare DNS, Google Public DNS aims to be a simple yet effective replacement for your default ISP DNS resolver or any other DNS server you’re currently using. Below are the IP addresses for the Google Public DNS servers.
- IPv4 addresses: 8.8.8.8 and 8.8.4.4
- IPv6 address: 2001:4860:4860::8888 and 2001:4860:4860::8844
- DNS-over-TLS address: dns.google
OpenDNS
The Cisco-owned OpenDNS is quite a popular public DNS provider. It blocks phishing websites by default and provides optional parental controls and content filtering services. Below are the IP addresses for the OpenDNS servers.
- IPv4: 208.67.222.222 and 208.67.220.220
AdGuard DNS
AdGuard DNS, as the name suggests, provides ad-blocking services via its DNS resolver services. By default, the DNS provides protection from Ads, trackers, and phishing. Additionally, it also comes with a non-filtering server and a family protection server. AdGuard is also one of the few DNS providers that currently support the recent DNS-over-QUiC protocol. You can access the setup guide for those here. Below are some IP addresses for the AdGuard DNS servers.
Default server (adblocking)
- IPv4: 94.140.14.14 and 94.140.15.15
- IPv6: 2a10:50c0::ad1:ff and 2a10:50c0::ad2:ff
- DNS-over-TLS: dns.adguard-dns.com
Non-filtering server
- IPv4: 94.140.14.140 and 94.140.14.141
- IPv6: 2a10:50c0::1:ff and 2a10:50c0::2:ff
- DNS-over-TLS: unfiltered.adguard-dns.com
Family protection server
- IPv4: 94.140.14.15 and 94.140.15.16
- IPv6: 2a10:50c0::bad1:ff and 2a10:50c0::bad2:ff
- DNS-over-TLS: family.adguard-dns.com


