Android users swear by their phone’s customisable features, but not many are aware of the advanced settings it offers under Developer Options. Hidden by default, these built-in tools are designed for use by technical professionals. However, an average user can access these Android Developer Settings with the proper knowledge to improve their smartphone’s efficacy. Here’s a detailed guide on how you can enable Developer Settings on your Android device, the best Developer Options available on the platform, and more.


Table of Contents
What are Android Developer Settings?
The Settings app on Android smartphones has a Developer Options menu intended for use by developers. The various options under this menu let developers check the functionality of an in-development app, test its performance in real-time, and debug the app before the final release. Since the Android Developer Settings can potentially affect the functioning of the phone, they are kept hidden from the average smartphone user.
This doesn’t mean though that a non-developer can’t use these power settings to gain more control over their Android device. However, it is recommended that you shouldn’t interfere with the Developer Settings if you don’t understand them as it can have a negative effect on your smartphone’s performance and functionality albeit short-term.
Note: The Developer Options may vary depending on the Android device you’re using.
How to enable Developer Settings on your Android device?
In order to enable the hidden Developer Settings on your Android smartphone, you need to locate its build number first. It must be noted though that the exact location of the phone’s build number may vary from manufacturer to manufacturer.
Here’s a step-by-step guide on how to turn on the Developer Options on your Android device:
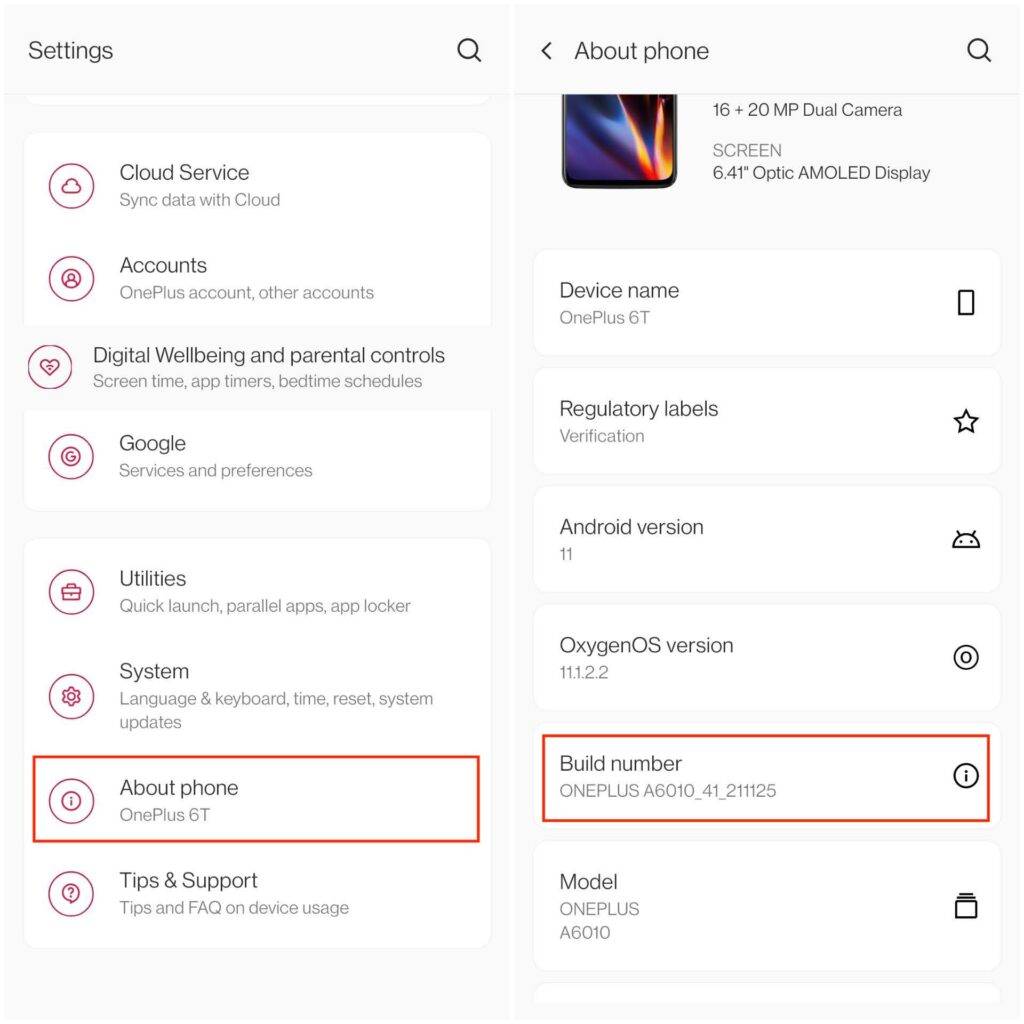
- Open the Settings app, scroll down to the bottom of the list and select About phone or About device. On Android 8 and 10, you’ll find the option under Settings > System.
- Scroll down the About phone menu to find the Build Number

- Tap the Build Number seven times. After a few taps, you’ll see a message that reads “You are now <number> steps away from being a developer“.
- Enter your PIN or pattern to enable the Developer Options menu. Once the settings are activated, you’ll see the notification “You are now a developer“.
- Tap the back button to return to the Settings pane. The Developer Options field will now appear in the Settings menu above the About phone option. In case, you don’t find the option there, it may appear under Settings > System.
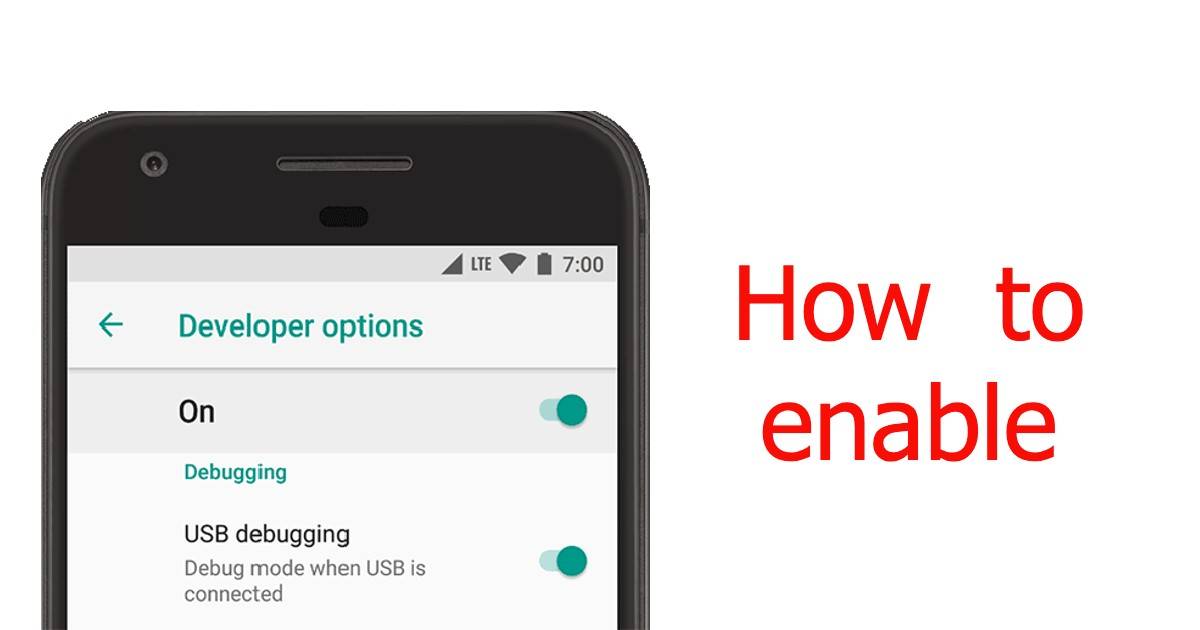
- Open the Developer Options menu and toggle the switch on (if it isn’t already). You can now proceed to adjust the existing Developer Settings of your phone.

Note: Once you’ve enabled the Android Developer Settings on your phone, you won’t have to do it again unless you perform a factory reset.
Best Developer Options available on Android
Now that you’ve unlocked the advanced settings on your smartphone, let’s look at some of the best Developer Options that you can tweak to enhance your Android experience.
Default USB configuration
If you often transfer files from your phone to your PC or vice versa via USB, this option can be of great use. It allows you to choose a default option, such as transfer data that will come into effect every time you connect a USB cable to your phone, without any intervention.
USB debugging
Turning on USB debugging establishes communication between your Android smartphone and the development machine through Android Debug Bridge (ADB). This option also helps with data recovery in situations where your phone display screen might stop working.
Stay awake
When enabled, the ‘Stay awake’ option prevents your display screen from turning off when the phone is plugged into a charger. This can be really useful should you wish to keep apps like Twitter open for live updates without having to tap the screen again and again.
Select mock location app
This is a great option should you wish to access media that is not available in your region or prevent Google from tracking your location at all times. All you need to do is install an app that can create mock locations and then enable the ‘Select mock location app’ option.
Force activities to be resizable
You can turn on the ‘Force activities to be resizable’ toggle if you wish to multitask between apps. Wondering how? Well, this option forces apps into being resized in split-screen, which enables you to use multiple apps at the same time regardless of manifest values.
Force 4x MSAA
If you are an avid gamer, the Force 4x MSAA option is built for you. When enabled, this one helps improve the quality of graphics in gaming apps. The only drawback is that you will run out of battery more quickly, but if that works for you – say hello to A-class graphics!
Background process limit
The ‘Background process limit’ option gives you the ability to select the number of apps that can be running in the background. You can set the limit to as high as four and as low as zero. If you choose to have zero background processes, all apps will be terminated after use.
Check running services
Quite similar to Task Manager on a Windows PC, the ‘Check running services’ option allows you to see all the processes currently running on your smartphone and how much RAM each app is using. This way, you can easily shut down the apps that are using more memory.
FAQs
How to disable Developer Options on Android?
It’s quite easy to disable Developer Options. All you need to do is head to Settings > System > Developer options or Settings > Developer options on your Android smartphone and turn the toggle at the top of the screen off. You can also perform a factory reset on your phone.
Is there a drawback to enabling Developer Options?
All you need to remember is you shouldn’t change anything that you don’t know about and you’re good to go! This is important as interfering with the Developer Options without any purpose and understanding as it can impact your phone’s performance and functionality of certain apps. In case anything goes wrong, it is best to go back to the default settings.
")


")


 review: a gaming laptop with style, substance, and a big scoop of performance")


