Learning how to transfer photos from your mobile phone to your PC or laptop is highly important. While phones come with a sizeable internal memory these days, extended usage is bound to fill the storage space. Moreover, editing software often functions better on computers than on phones. Whether it’s for editing your photos on your computer or backing up the photos to save your phone’s storage, these methods will come in handy. A couple of disclaimers before we begin: firstly, if you’re using a USB cable, make sure that you’re using the appropriate cable for your device. Secondly, update your software for both phone and laptop before proceeding with the transfer.
Moving on, here’s how you can transfer photos from your mobile phone to your Windows laptop/PC or Mac.
Also read: Screen recorder for PC: How to record screen on Windows 10, 11 laptops and Mac
How to transfer photos from mobile phone to laptop via USB
Transferring photos from your mobile phone to your laptop via the USB cable can be a cumbersome and slow task. However, it is still one of the most reliable ways to transfer files. Here’s how you can use this method in various scenarios:
Android phone to Windows PC/laptop
- Unlock your phone and connect it to the computer through your USB connector.
- A notification will pop up stating “Charging this device via USB”. Click on it and select “File Transfer” when you are prompted with the “Use USB for” pop-up.
- If these options haven’t popped up, you can go to File Explorer. You should see an option called “This Phone”. Select it.
- Now you’re granted access to all the photos on your device. Your photos should be in the phone’s internal storage option.
- Once you’ve found your photos, you can copy and paste them onto a folder on your computer. If you want to create more space on your phone, you can cut and paste the pictures.
- Once you’re done, you can unplug your device from the computer.
Android to Mac via USB
- For users of Mac, you’ll need to download the Android File Transfer application.
- Open the application, and then connect your phone to the Mac using a USB connector.
- From the “Charging this device via USB” option, select “File Transfer” after you’re prompted in the “Use USB for” popup.
- The Android File Transfer window will pop up at this point. Alternatively, you can also find this application by checking Finder > Application.
- Drag the photos from your phone’s window to the laptop folder.
- Eject your device once you’re done with the photo transfer.
iPhone to Windows via USB
- Download the iTunes app for your Windows PC before proceeding with the photo transfer.
- Connect your iPhone to the laptop using the USB cable.
- You will have to approve the “Trust” notification that pertains to the computer you’re using. Select the option when the window pops up.
- If you’re using Windows 8 or 10, use the Photos app from the Start menu.
- At the top right corner of the screen, you’ll find the “Import” button. Click on it and select the “From a USB device” option.
- A window will pop up showing you all your photos. Select the photos that you wish to transfer to the computer. Click on Import.
- Unplug the device once you’re done with the transfer.
Note: If you’re using Windows 7, you’ll have to select the “Import pictures and videos using Windows” option in the Autoplay section. After this, select the photos you want to transfer and click Import.
Also read: Windows 11 download: How to download Windows 11 stable version on your PC/ laptop
iPhone to Mac via USB
- Connect your iPhone to your Mac using the USB cable.
- Select the “Trust” option when the notification is shown.
- The Photos app will open. You can then select the destination for import through the “Import to” option.
- If you’re importing new photos, use the “Import All New Items” option.
- If you want to transfer only selected photos, you can use the “Import Selected” option.
- After transfer, the photos can be found in the Imports section.
- After the transfer is done, eject your device from the laptop.
How to wirelessly transfer photos from phone to laptop
With the progress in technology today, it’s become far easier to transfer files from one device to another. Gone are the days when you would have to mandatorily use pesky cables to manage transfers. Let’s have a look at how you can wirelessly transfer your photos from the phone to the laptop.
Phone to laptop via email
- Go to your phone’s mailing app and compose a mail with the relevant subject line.
- Attach the pictures that you would want to transfer to your laptop.
- If you’ve got another mail, you can use that as the recipient of the new mail. Make sure that your secondary mail is accessible from the laptop.
- Send the mail with the relevant photos.
- Access your secondary mail and download the pictures from the newly received email. The images/ videos will most likely be saved in your Download folder or last saved location.
Phone to laptop via cloud storage
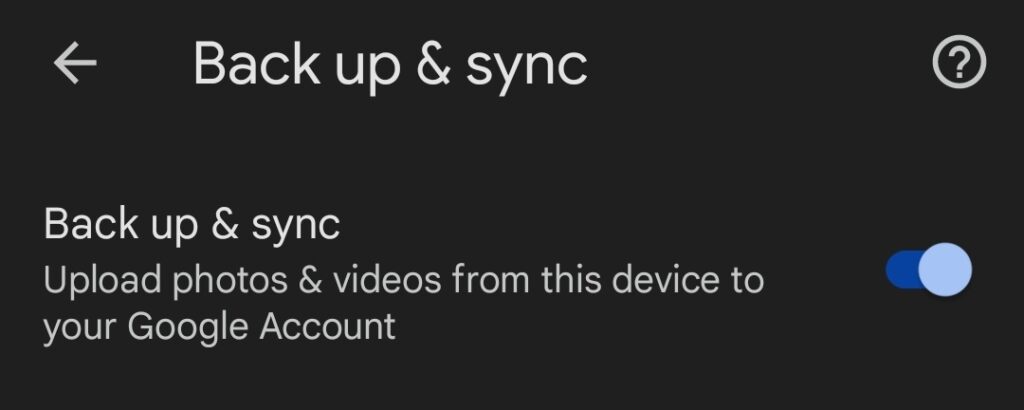
You can access the photos available on your phone if you link both the Android device and the laptop to the same Google account. You will have to ensure that you’ve backed up and synced your photos to the same account. Logging into the same Google account through your laptop will allow you to access the photos.
- Google Photos has a handy option for this. The app comes installed on pretty much every Android device out there. You can also download it from App Store on your iPhone.

- After this, allow the Google Photos app to access your images and videos and automatically them backup on cloud. The latter can be done through tapping on your profile on Google Photos and toggling the button next to Back up & sync under Photos settings option.
- For iPhones and Macs, using the iCloud storage and syncing the account to all your Apple devices will allow you to transfer photos seamlessly and wirelessly. That said, iCloud only offers 5GB of free storage whereas the Google Photos offer up to 15GB of free storage.
From iPhones to Mac
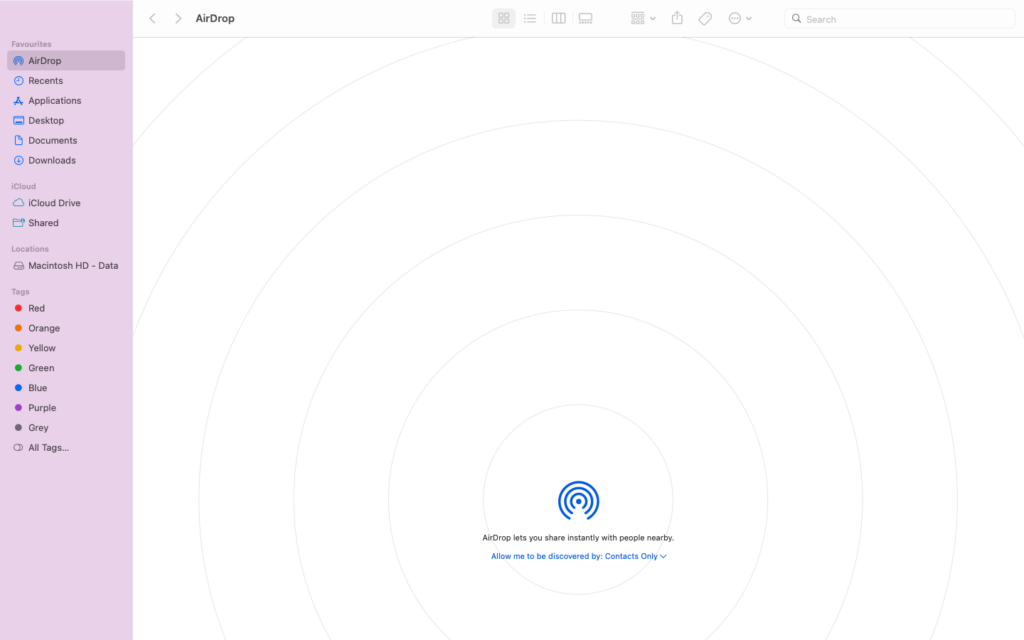
This is particularly easy as both devices come with AirDrop that lets you transfer pictures and videos from your iPhone to Mac wirelessly without backing it up to the iCloud first. Here’s how it works:
- Choose the photos and videos you wish to transfer from iPhone to Mac
- Select share option. From there, choose AirDrop
- Ensure that both Bluetooth and Wi-Fi are turned on on both devices. In addition to that, stay within 30 feet of the device that you’re transferring to.
- Your iPhone will perform a quick search and show you a list of nearby devices that support AirDrop. If your Mac isn’t visible, open Finder on your PC and select AirDrop option from the left pane and choose “Allow me to be discovered by” option, from the bottom of the screen
- Now, choose the device you wish to transfer your files from iPhone
- A pop-up will appear on your receiving device. Choose allow/ accept
- After this, your transfer will begin. Once the photos have been transferred, select Done.
Also read: Google Photos free unlimited storage ends: how to download all Google Photos images and videos
Phone to laptop via App:
From Android/iPhone to Windows
Windows laptop/ PC used to have a companion app that would allow users to transfer images from phone. Unfortunately, it has been discontinued. But, fret not, we have got you covered.
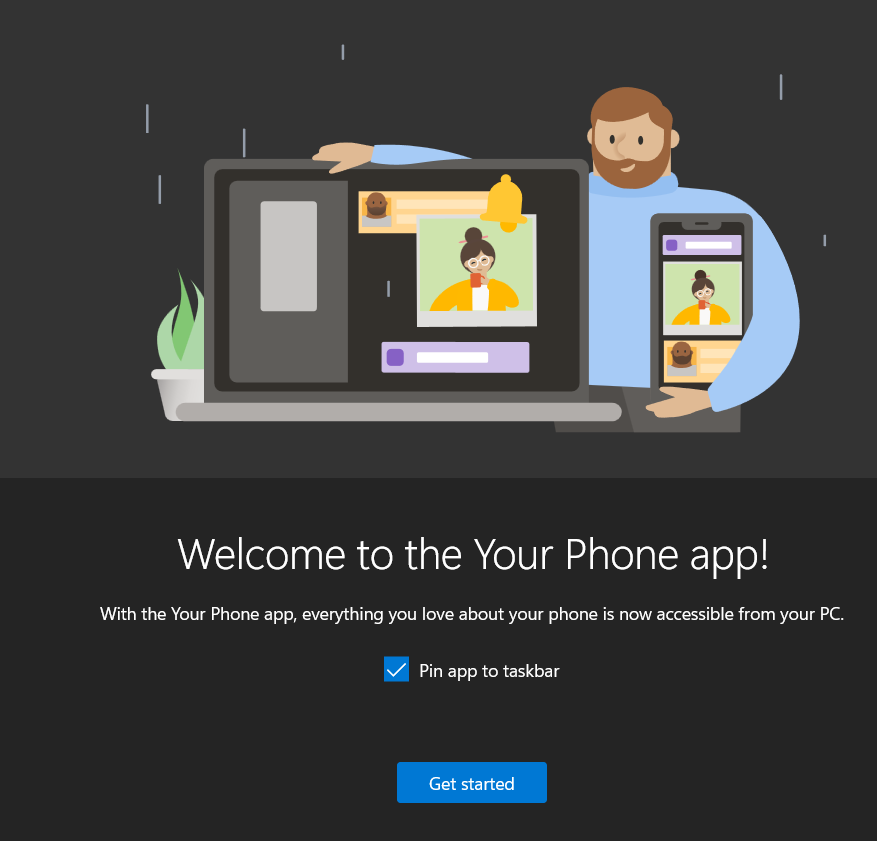
- You can use the Your Phone app to transfer files from your phone to your laptop wirelessly via app. Download the app on your Windows PC/ laptop as well as your Android smartphone and iPhone
- Once the app has been downloaded on PC, go to Settings > Your phone tab. Select the ‘Add a phone’ option.
- The Your Phone app window will pop up, and you can choose either Android or iPhone based on your device.
- Link your phone to the laptop using the QR Code, or sign in to your Microsoft account.
- At the desktop app, select the “Yes, I finished installing Your Phone Companion” option. After this, choose the “Open QR Code” option and scan the QR Code from your handheld device to finish linking your phone to the PC.
- The desktop app should now have the “Let’s Go” option. Select it. You’ll find your phone listed in the “My Devices” section of the app.
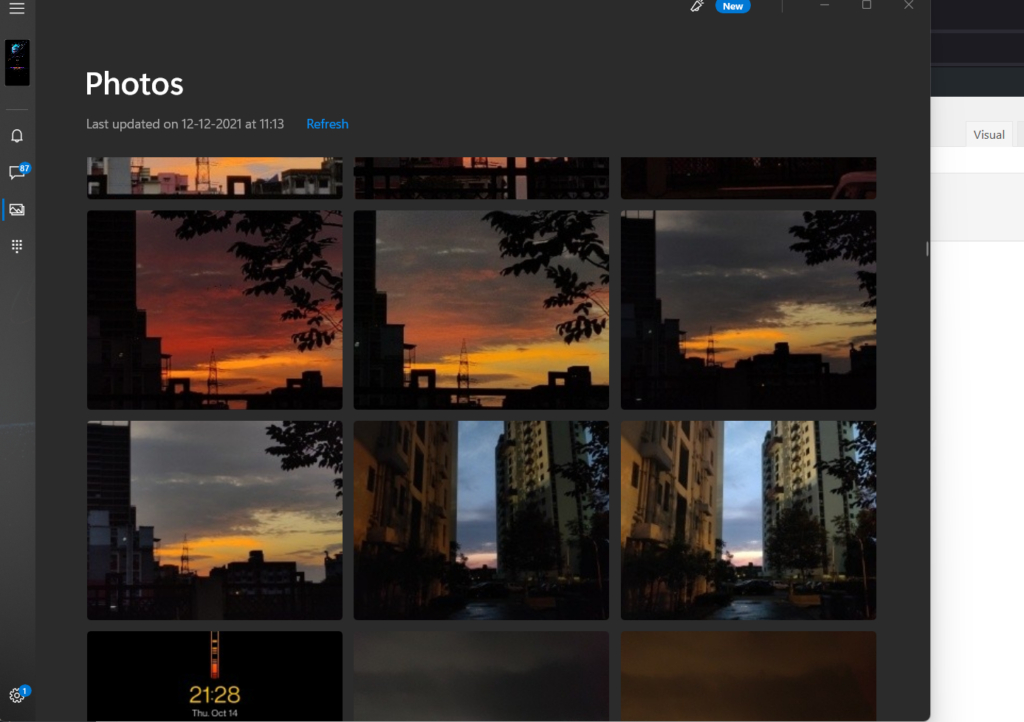
- In the Settings tab, go to General and flip the switch under the “Allow this app to show photos from my phone” option.
- Now your desktop app should show the most recent photos and screenshots on your phone. If the photos aren’t visible, you can select the Photos tab at the left side of the screen, and choose the “See photos” option.
- To save the photos, right-click on a photo and select Save.


 gets ChatGPT integration, new features with Nothing OS 2.5.5 update")
