If your laptop is not starting even after running all the troubleshooting steps, then a Windows OS reinstallation might be what you need to fix the issue. There are several reasons you might want to reinstall Windows on your PC. Many users prefer a clean install of the Windows OS to eliminate the bloat the manufacturers ship with a new PC/laptop. This helps with performance and cleaning up the unnecessary clutter that distracts you on your PC. Reinstalling Windows also helps when it fails to recognise new hardware on your PC. A corrupt Windows update or faulty driver might also cause issues with the normal Windows operation and make the PC unable to boot. Whatever may be the reason, we help you easily reinstall Windows 10/11 using the installation media with the below quick step-by-step guide.
Before we get started it is worth noting that Windows 10 and Windows 11 follow a very similar process for reinstalling Windows, so the below instructions will work for both Windows 10 and Windows 11.
Table of Contents
Preparing Windows installation media
You’ll need a bootable Windows installation media to start reinstalling Windows. Microsoft makes it very easy to create installation media via its media creation tool from its Software Download website. Creating bootable Windows installation media requires a USB Pen drive/flash drive with a minimum 8GB storage capacity. Once you get your hands on an empty USB drive, you just need to connect it to your PC/laptop and follow a few easy steps and you’ll be good to go. Here is a step-by-step guide to creating Windows 10/11 bootable USB drive using a media creation tool:
- Go to the Microsoft Download website
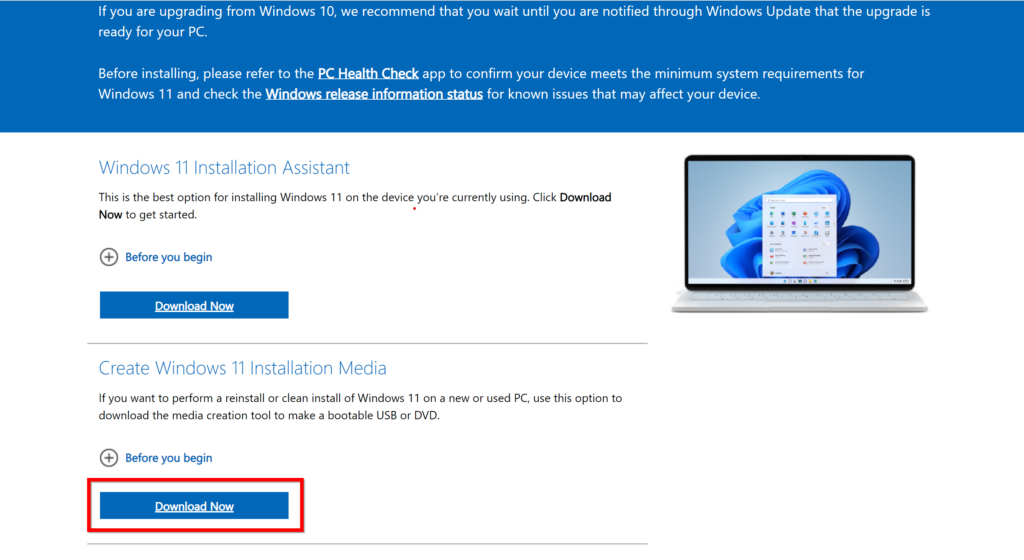
- Scroll down and in the Create Windows 11 Installation Media section click on the Download Now button
![]()
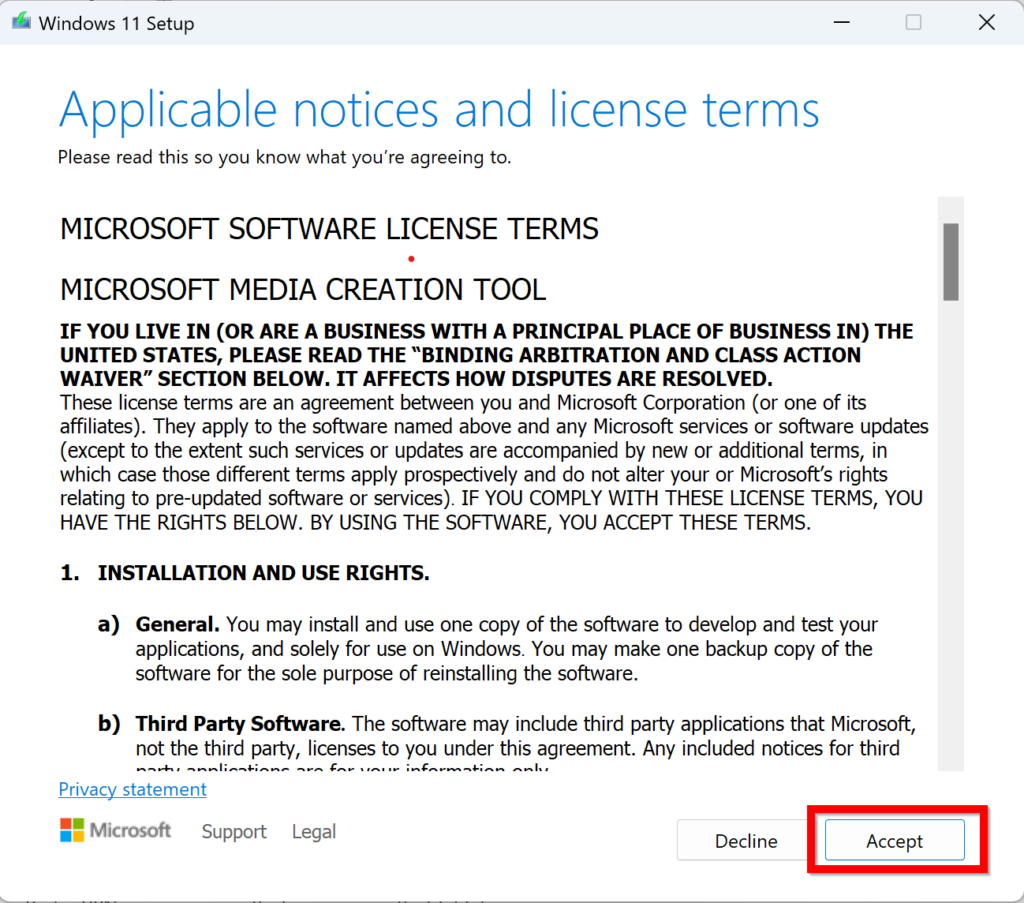
- Download and install the media creation tool and accept the terms
![]()
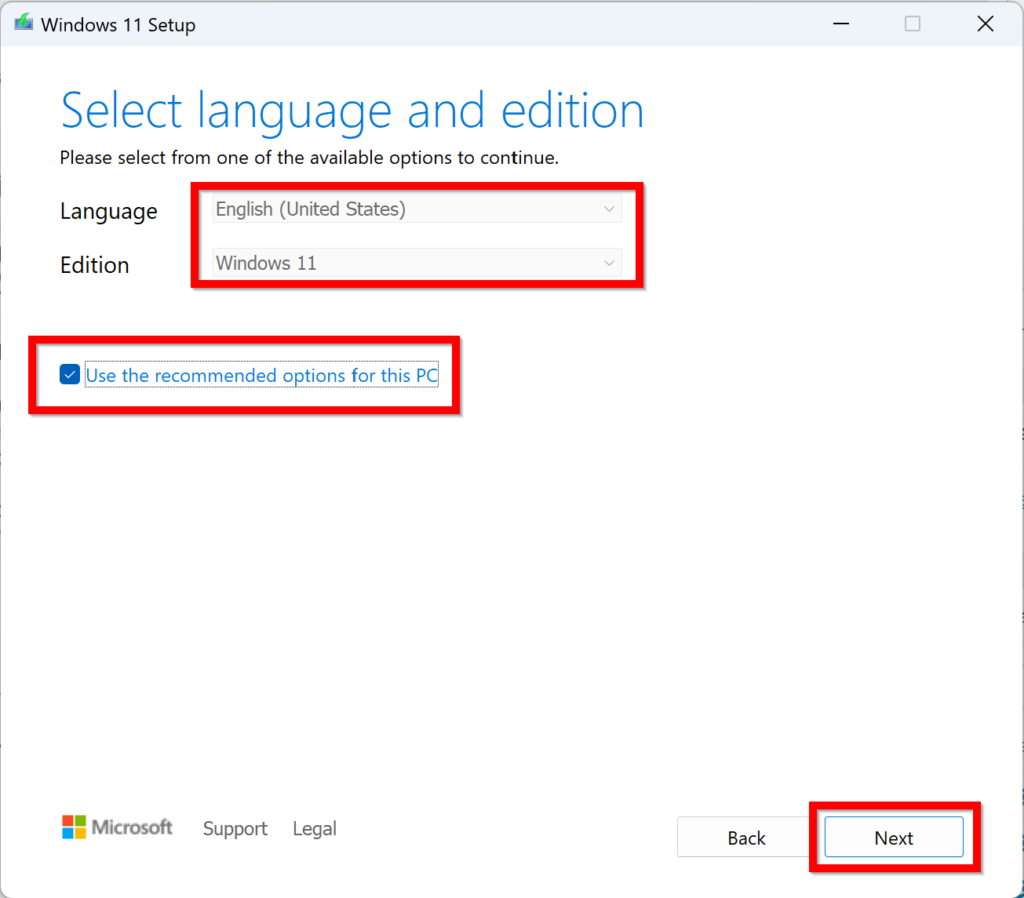
- Now on the next screen, select the Language and the Edition of Windows. By default, the installer takes the default system OS setup settings. For instance, the PC we are using here is running Windows 11 64-bit version (US English), so the media creation tool is taking this as a cue and loading the default setup for creating the installation media, and we recommend you keep these settings as they are if you’re creating a bootable media for the OS version your currently running. You can change the desired OS language and other options in the media creation tool by unchecking ‘use the recommended options for this PC’ option.
- Once you select the required Windows version to create bootable media for, click Next
![]()
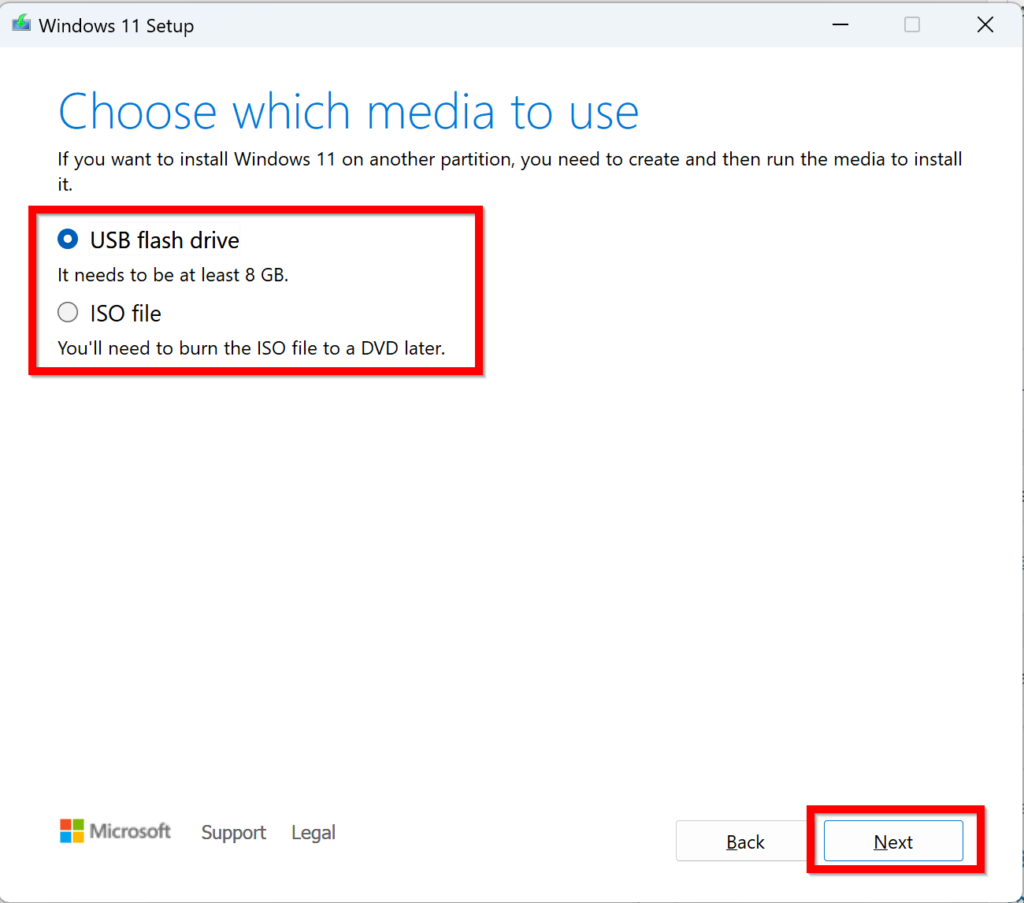
- Insert a USB flash drive into the PC/laptop. Keep in mind the flash drive needs to have an 8GB storage capacity.
- Select the USB flash drive option on the next screen and click Next
![]()
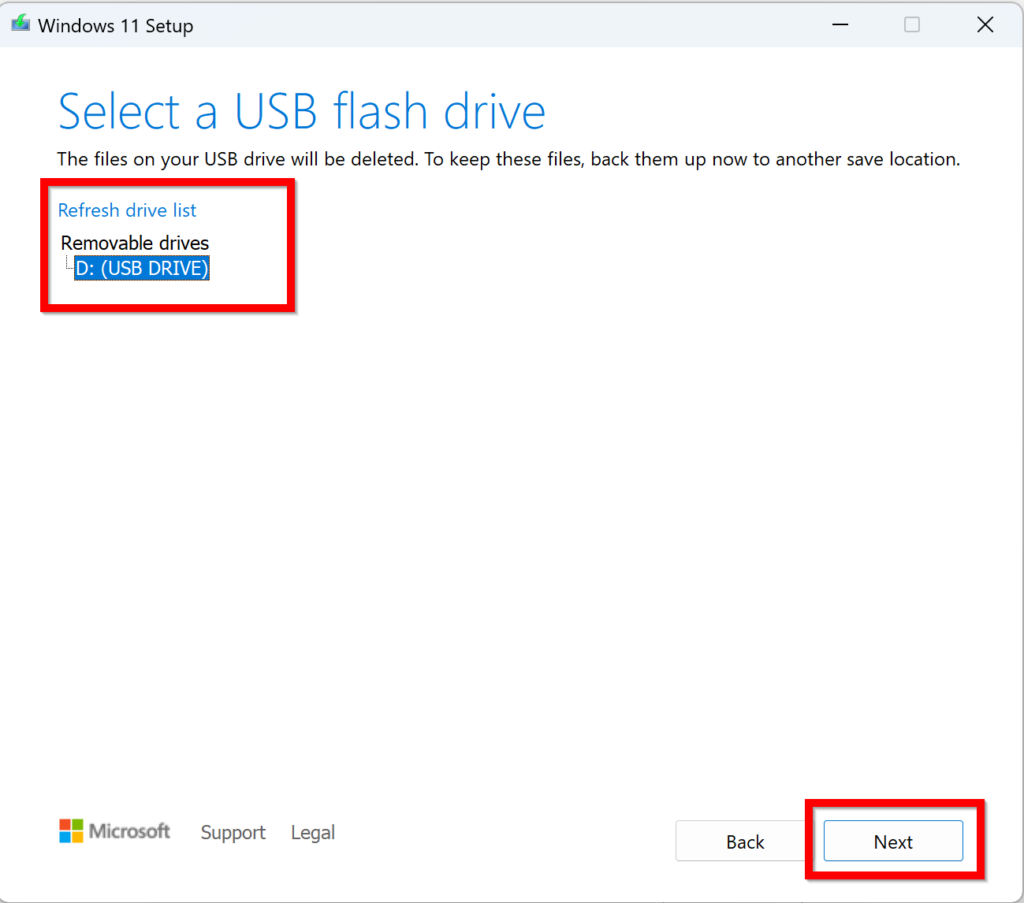
- Now select the USB flash drive you just attached from the list of available drives
- Click Next
![]()
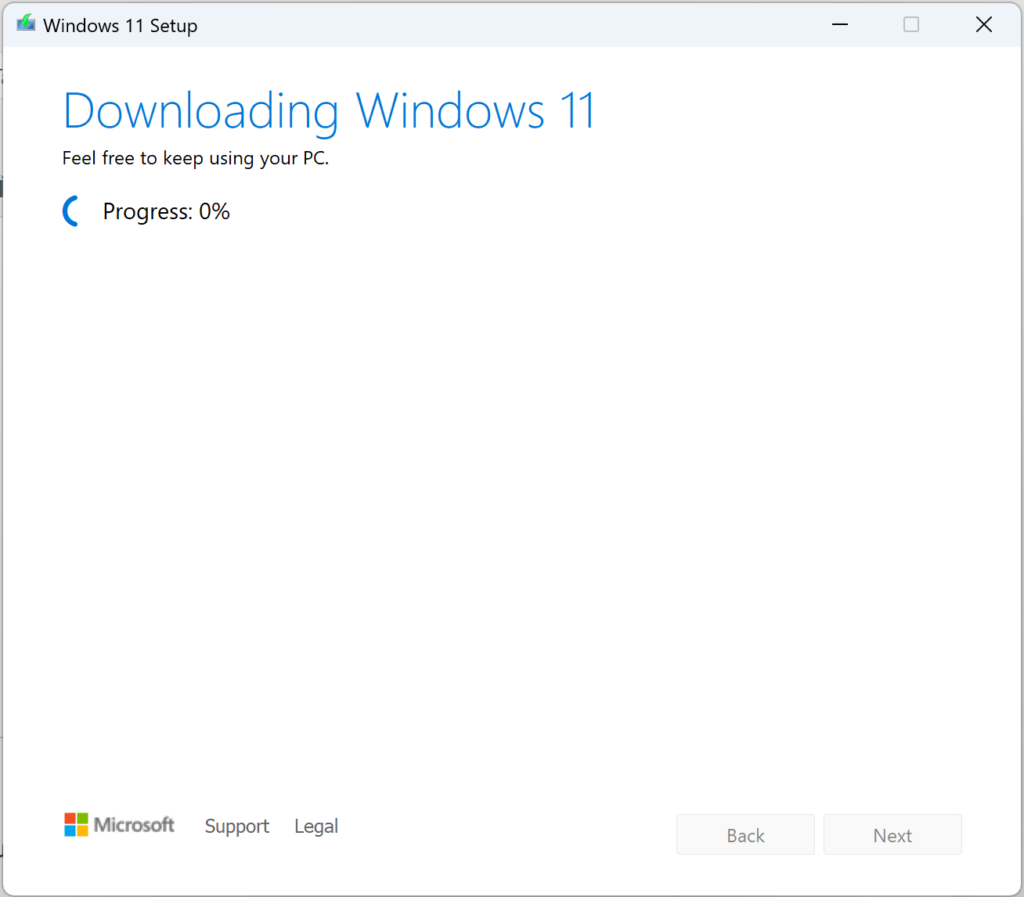
- The media creation tool will download the files and burn the Windows ISO to the attached USB drive. Wait for the process to finish.
![]()
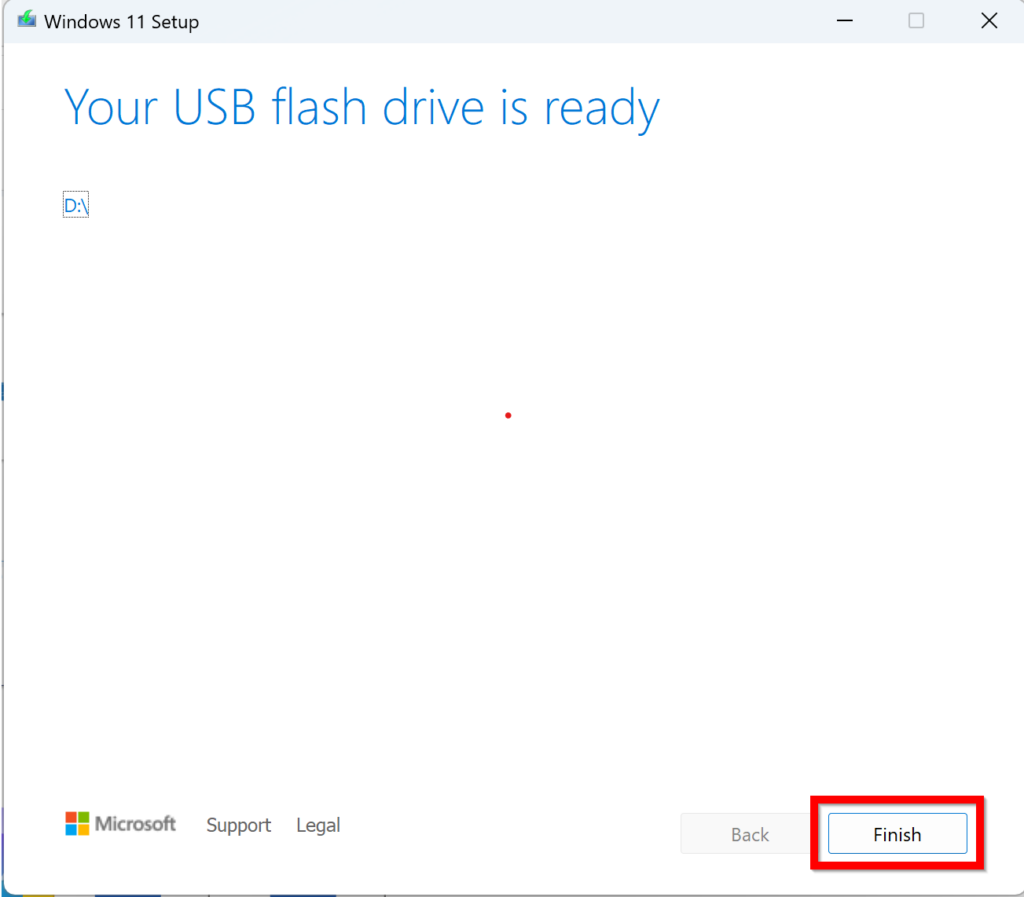
- Click Next after the download is finished
- Click the Finish button to complete the process. We now have our hands on a bootable Windows USB drive.


Backup important data
Now that we have a bootable Windows USB drive, we can start installing Windows. But before that, we need to back up important files as clean installing Windows requires a complete data wipe. Windows provides several ways to back up local data such as from the Backup and Restore utility. Follow the below steps to back up your important PC files using the tool:
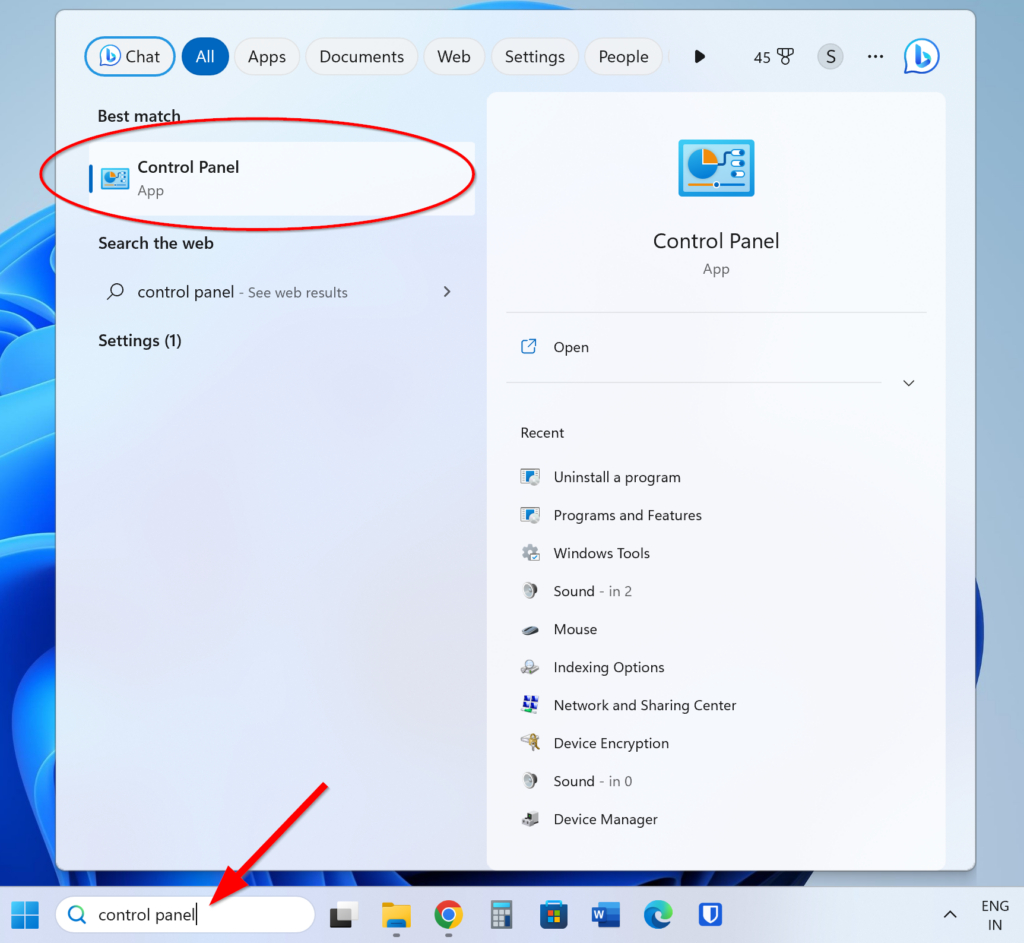
- Go to Control Panel or search for the same in the Windows search bar
![]()
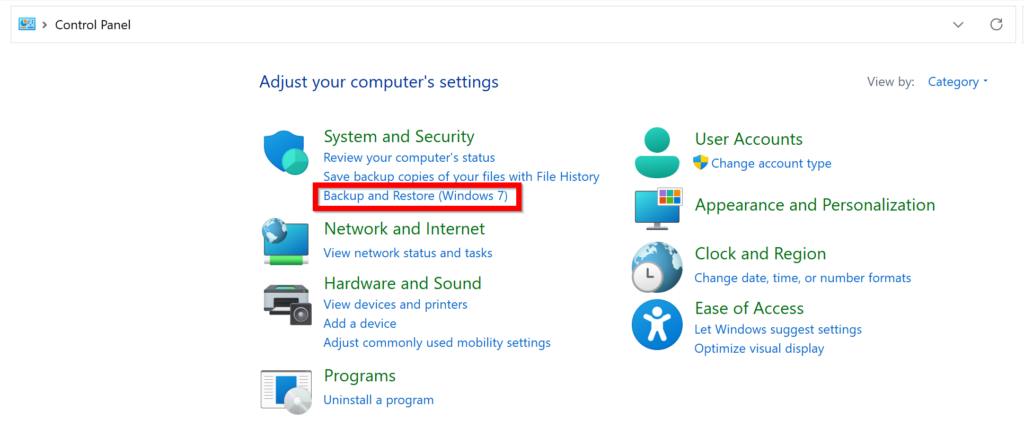
- Select the Backup and Restore option from the System and Security settings
![]()
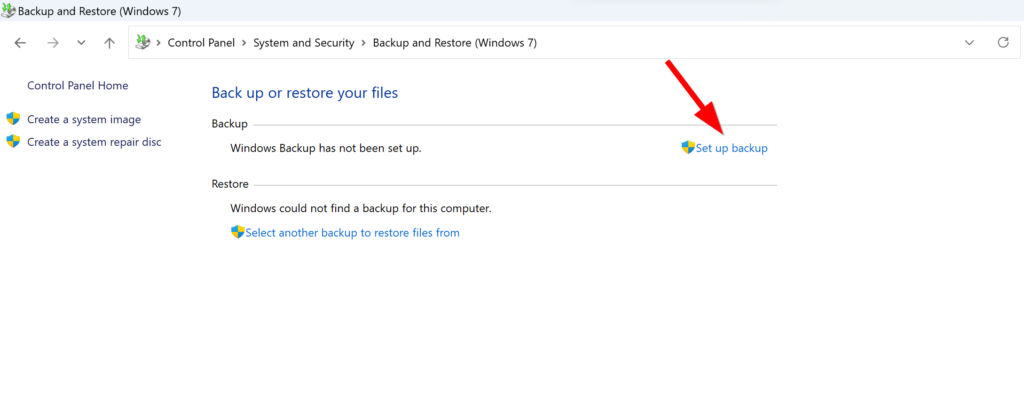
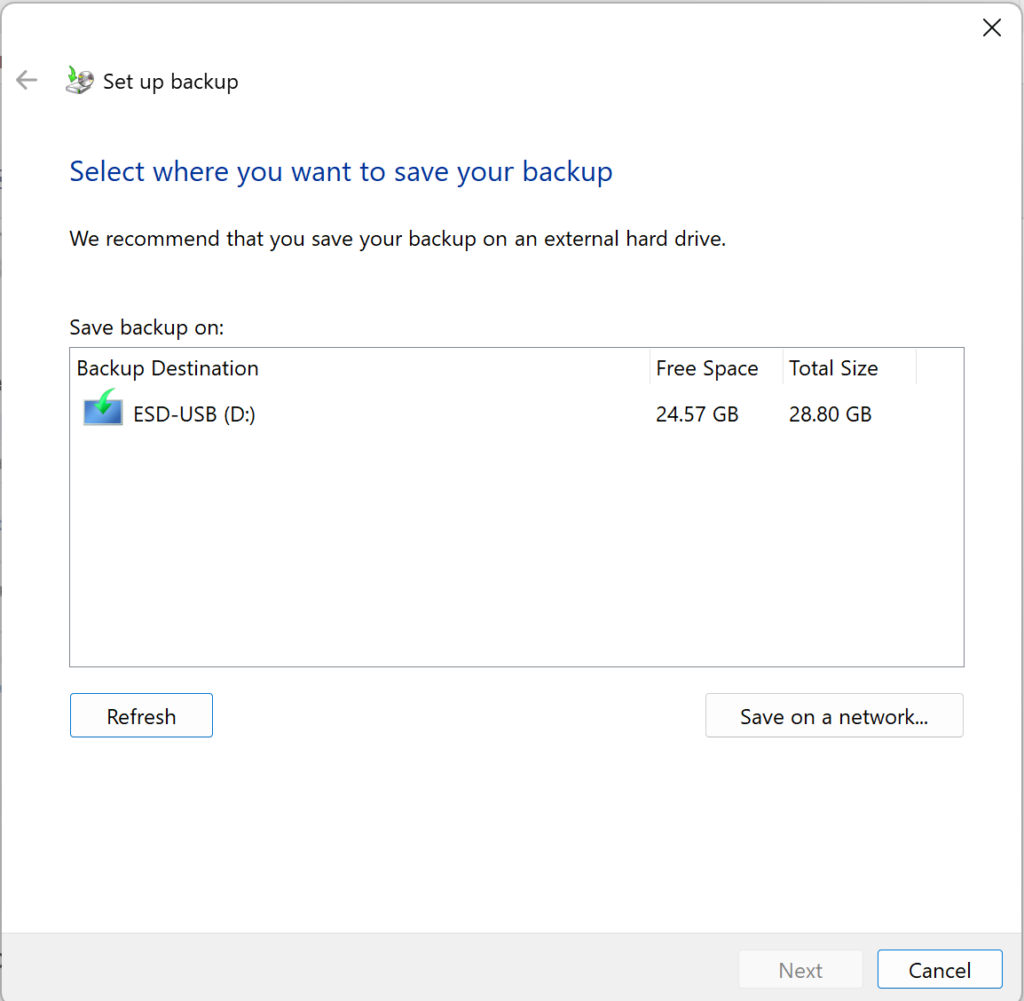
- Click on Set up backup option
![]()
- Attach an external hard drive
- Follow the on-screen instructions to take a full backup of the Windows
Link Windows to a Microsoft account
There is one more important step before we begin the Windows reinstallation process — linking Windows to a Microsoft account. Microsoft introduced the digital license model for Windows activation starting with Windows 10. Modern versions of Windows no longer primarily rely on the product keys for activation and instead link the activation licenses with a Microsoft account. Microsoft verified the Windows 10 by registering the laptop’s hardware with the company’s servers. This ensured the laptop can always automatically reverify the installed Windows copy even when Windows is clean installed where all the local data is wiped.
Microsoft now makes it mandatory to sign in with a Microsoft account on Windows 11 while starting the PC for the first time. The Windows 11 activation is linked with the signed-in Microsoft account, which means if you fail to successfully link a Microsoft account on the new PC/laptop, it may fail to reverify the Windows license when you re-install/clean install Windows 11. This could mean losing access to the genuine version of Windows on the laptop. This is why it is necessary to link a Microsoft account with Windows. That said, here’s how you can link Windows with a Microsft account.

- Go to System Settings
![]()
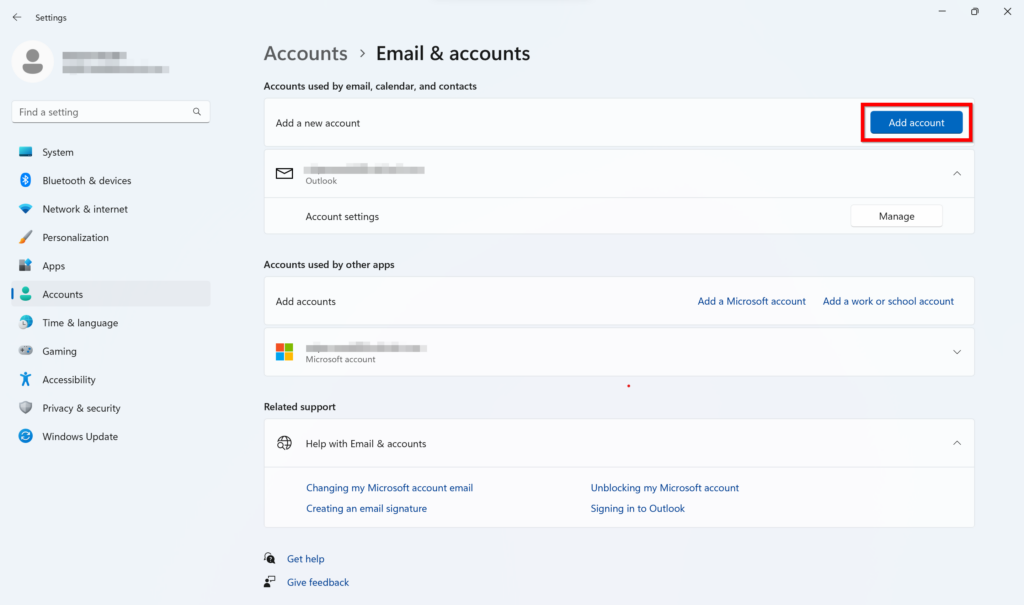
- Select Accounts
- Tap on E-mail & accounts
![]()

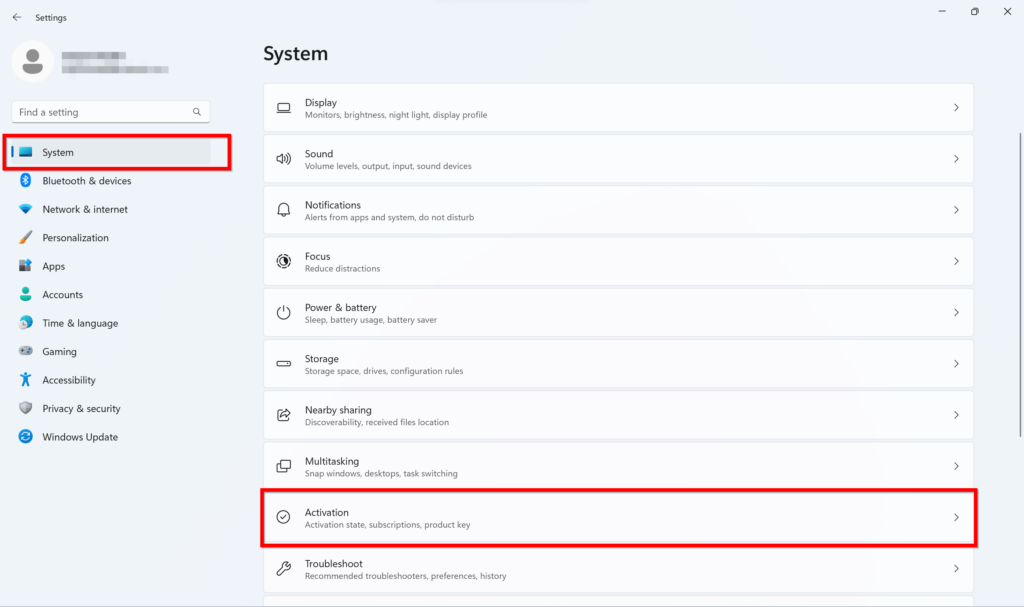
- To verify Windows activation, Go to Settings –> Activation
![]()
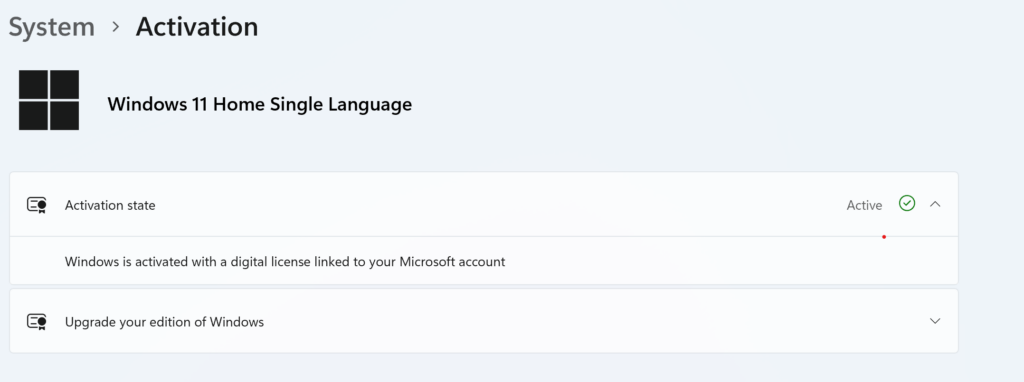
- If Windows is successfully activated, it’ll show the Active icon in the Activation state section of the Activation screen.


How to reinstall Windows 10/11
Now that we have prepared a bootable Windows USB drive, backed up the important data, and linked the Windows license to a Microsoft account, we are ready for the reinstallation process. So, without further ado, let’s get started with the steps.
If you can boot into Windows
If you can start Windows and have the installation media ready, it is extremely easy to do a Windows reinstall. Follow the below steps to do a Windows reinstall:
- Attach the bootable Windows USB drive we created earlier
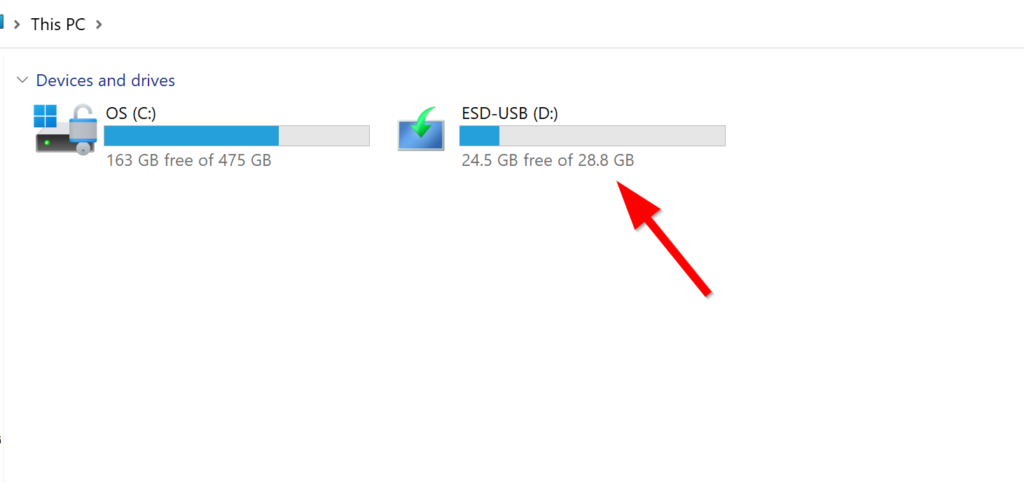
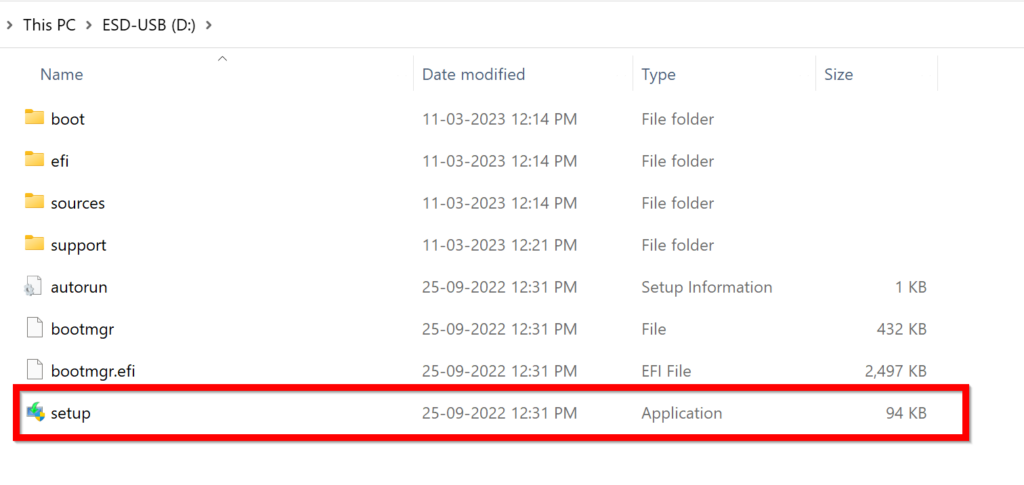
- Open the drive
![]()
- Double-click on the Setup file
![]()
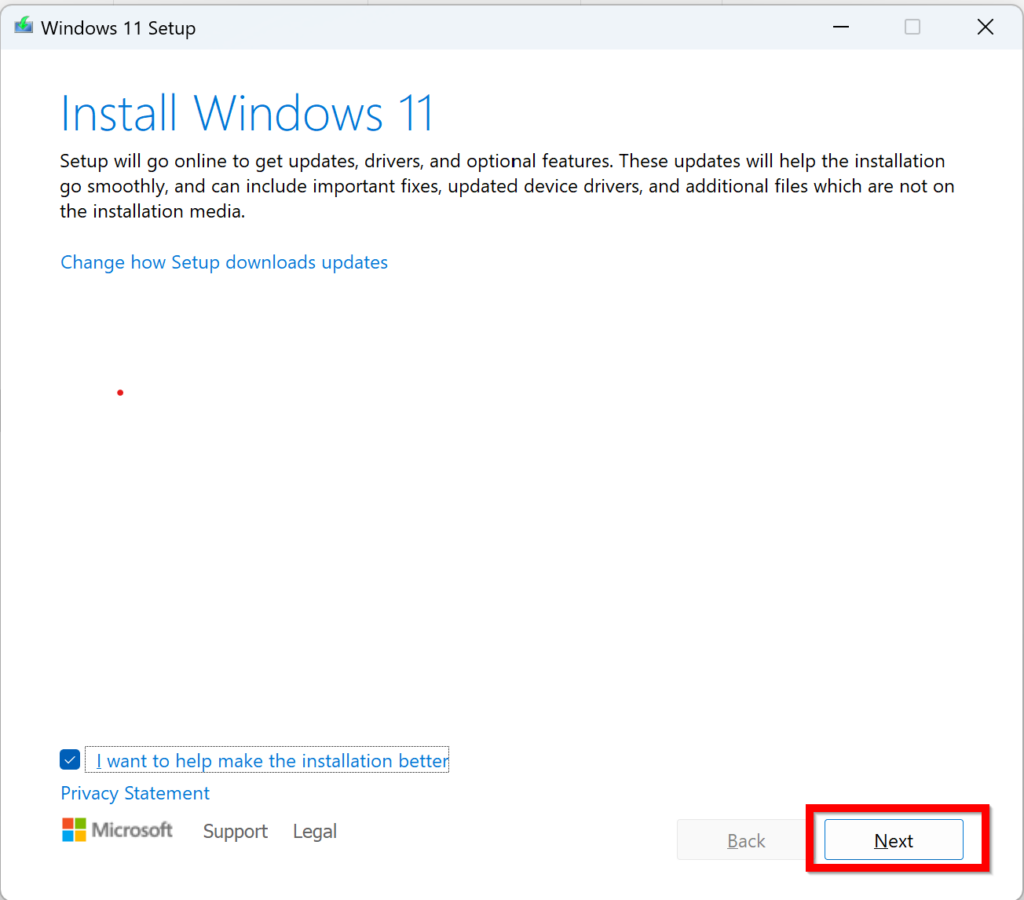
- The setup will ask you whether you want to proceed with Windows reinstallation and will go online to check for any pending updates — click Next. Note that you need an active internet connection to download the updates, otherwise, if there is no internet connection, the installer won’t download any updates and jump directly to the Windows reinstallation process.
![]()
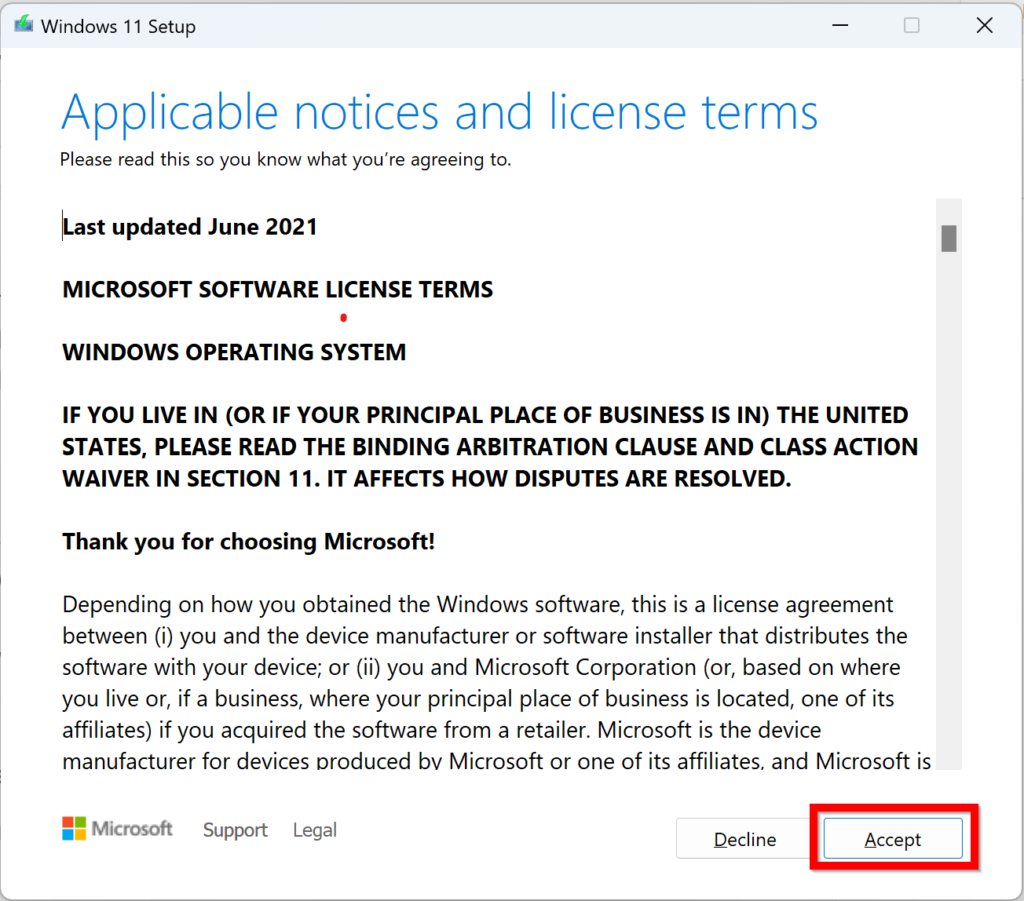
- Accept the terms on the next screen
![]()
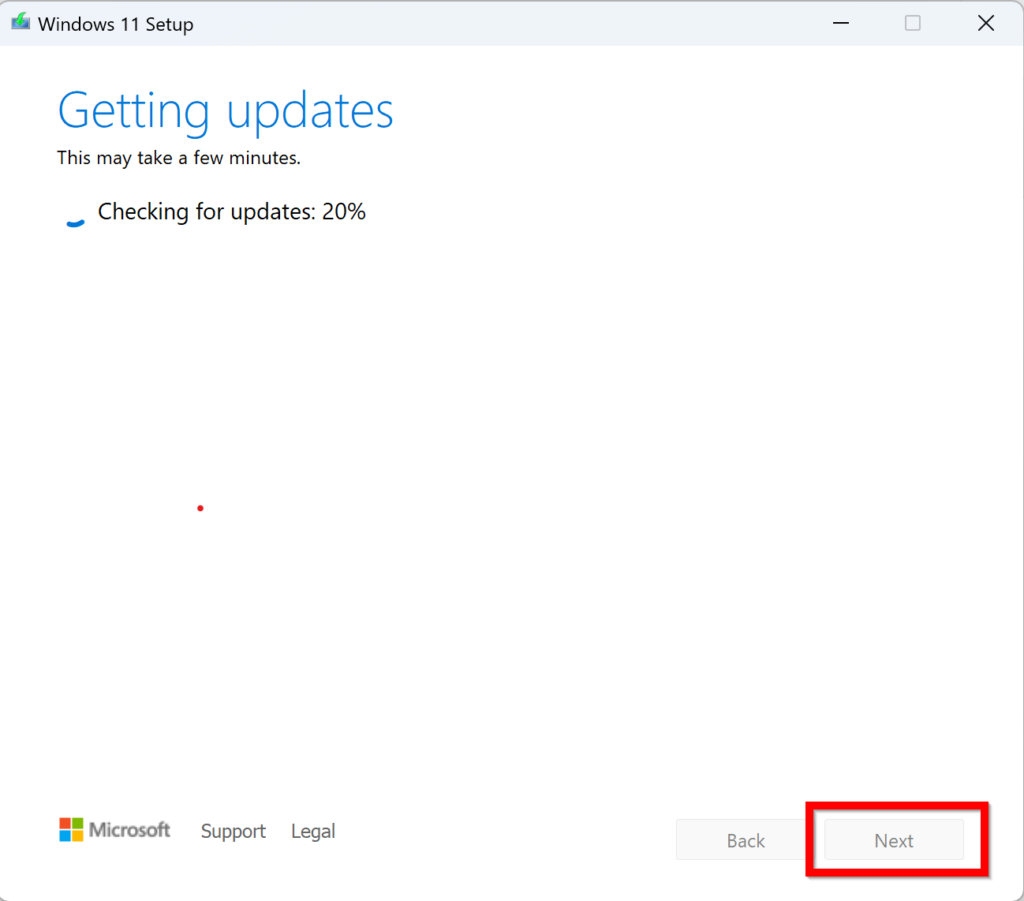
- The installer will begin downloading any pending updates. Click Next when done
![]()
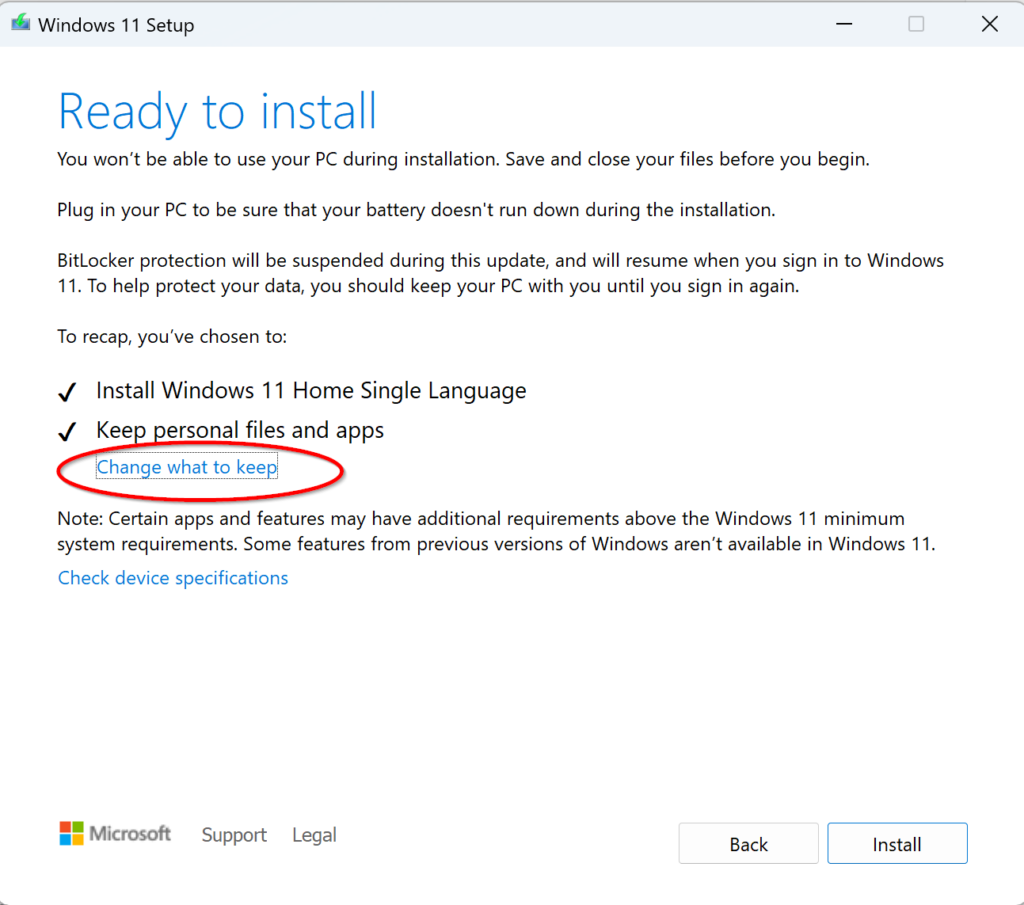
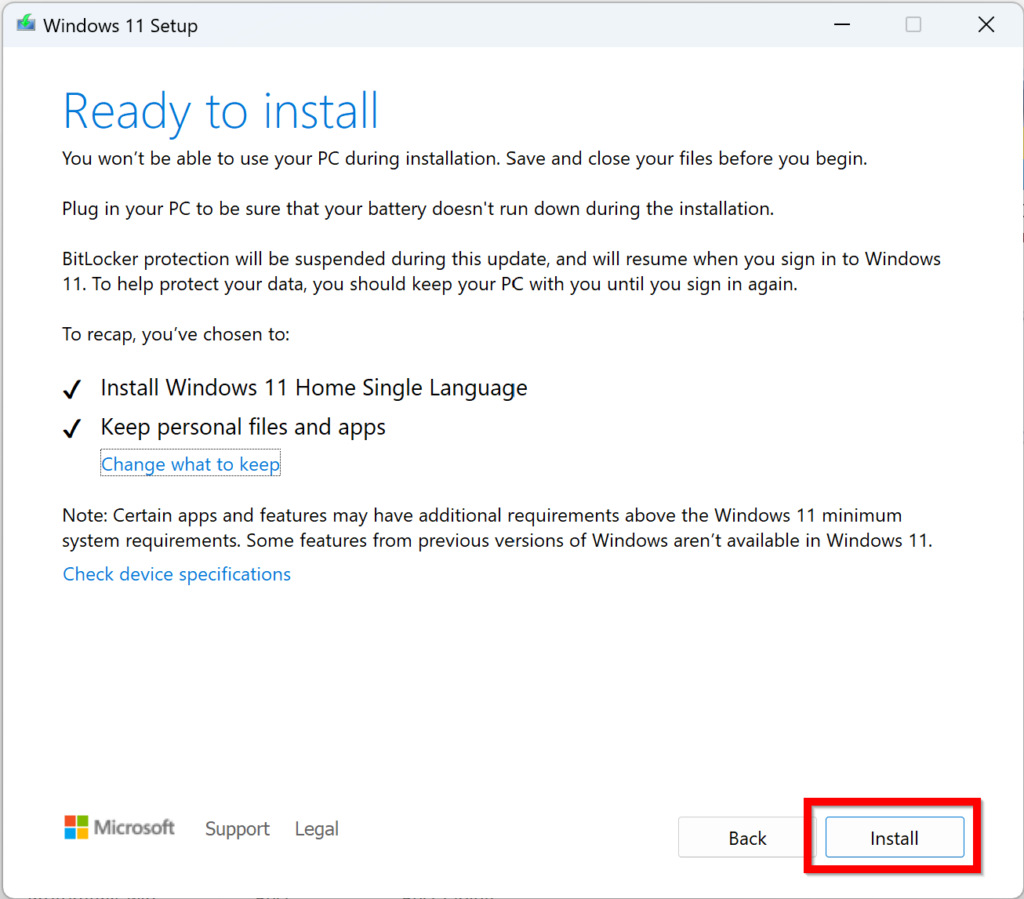
- The next screen will present you with the Windows installation prompt. This is where you can choose to upgrade Windows by keeping personal files and apps or wiping entire local data
![]()
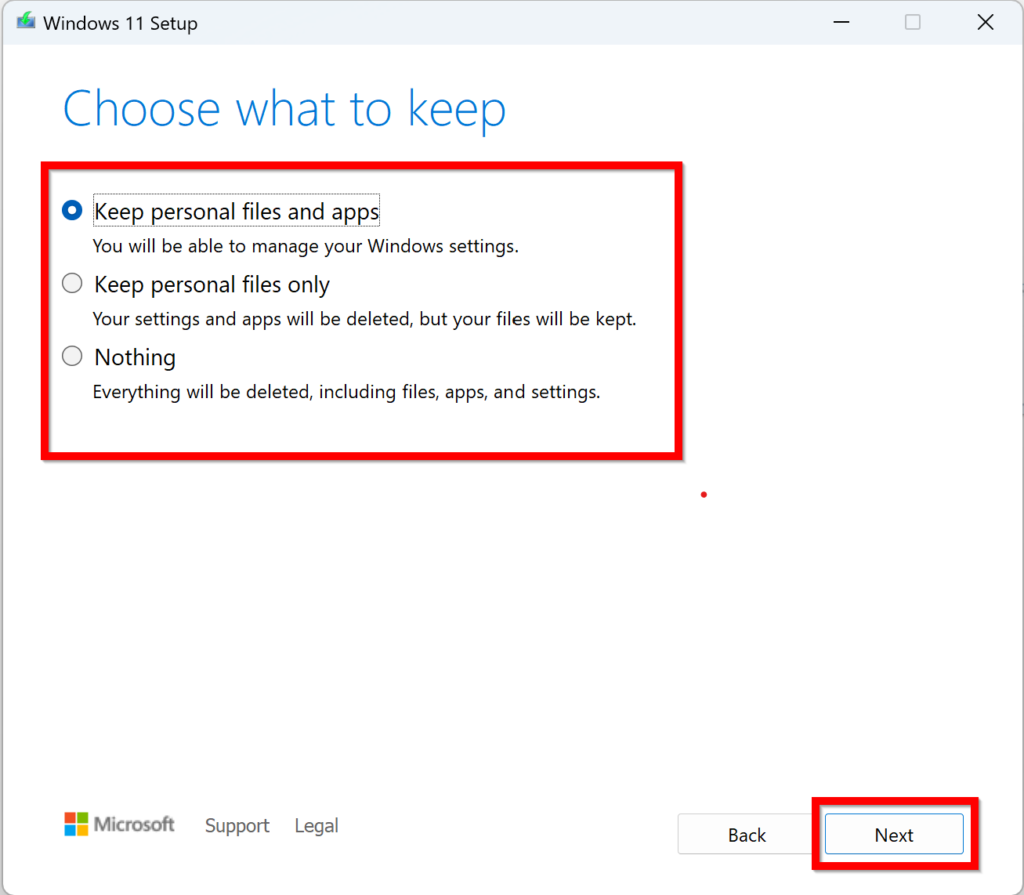
- If you’re intending to start anew, select Nothing, which will erase all the existing data from the hard drive.
![]()
- Click Next –> Install to begin the Windows installation process
- Your PC will restart several times and finally boot to the start-up screen.
If you cannot boot into Windows
For some reason, if your PC or laptop is not booting, and you’ve tried all the basic troubleshooting steps, you may want to clean install the Windows OS using the bootable USB media from the Windows boot manager. This may require you to change the boot order from the BIOS or UEFI menu to boot from the bootable USB flash drive. On a few laptops, the laptop’s boot menu can be accessed by pressing Esc repeatedly while the PC is starting. You can also search for “how to access the boot menu on an Asus/HP/Lenovo laptop” for instance on the internet to find instructions. You can then choose the bootable USB drive from the boot menu to boot into the Windows installation setup. For your convenience, we have listed down some of the shortcut keys for accessing the boot menu on laptops from popular manufacturers:
| Laptop | Boot menu shortcut |
| Asus | Esc |
| HP | Esc |
| Acer | F12 |
| Samsung | F12 |
| MSI | F11 |
| Dell | F12 |
| Lenovo | F12 |
Once you access the Windows boot menu, select the bootable USB drive from the boot manager and follow the below steps:
- The boot manager will take you to the Windows setup screen
- Select the Language to install, Time and currency format, Keyboard, and input method from the menu. By default, the US format is selected.
- When you’re satisfied with the format preferences, click Next
- Click Install now to begin Windows 10/11 installation
- Accept the terms in the next screen and click Next
- The next screen will present you with the Upgrade and Custom options.
- Select the Custom option to clean install Windows 10/11. (Keep in mind the Windows clean installation process will erase all the files on the drive. So back them up!)
- After you select the Custom option, you’ll get the option to change the storage partitions. By default, the Primary partition is selected where you can install Windows 10/11. (If you want to change the Windows installation location, you can create a new storage partition using the Delete, Format, New, and Extend options present below and install the Windows OS there.)
- Proceed with the Primary partition to install Windows OS and then click Next.
- If you’re presented with the warning that if you already have the Windows OS installed in the selected partition, all its files will be moved to a “Windows.old” folder, select OK.
- The Setup will now begin installing Windows — follow the on-screen instructions to clean install a fresh copy of Windows, which is free from any manufacturer bloatware. Keep in mind to keep the laptop turned on during the entire installation process. Otherwise, it’ll corrupt the existing installation and make the PC unable to boot. You’ll need to do the Windows reinstallation from the start to start your PC normally.
FAQs
1. Is there a way to recover/reset Windows without using an installation media?
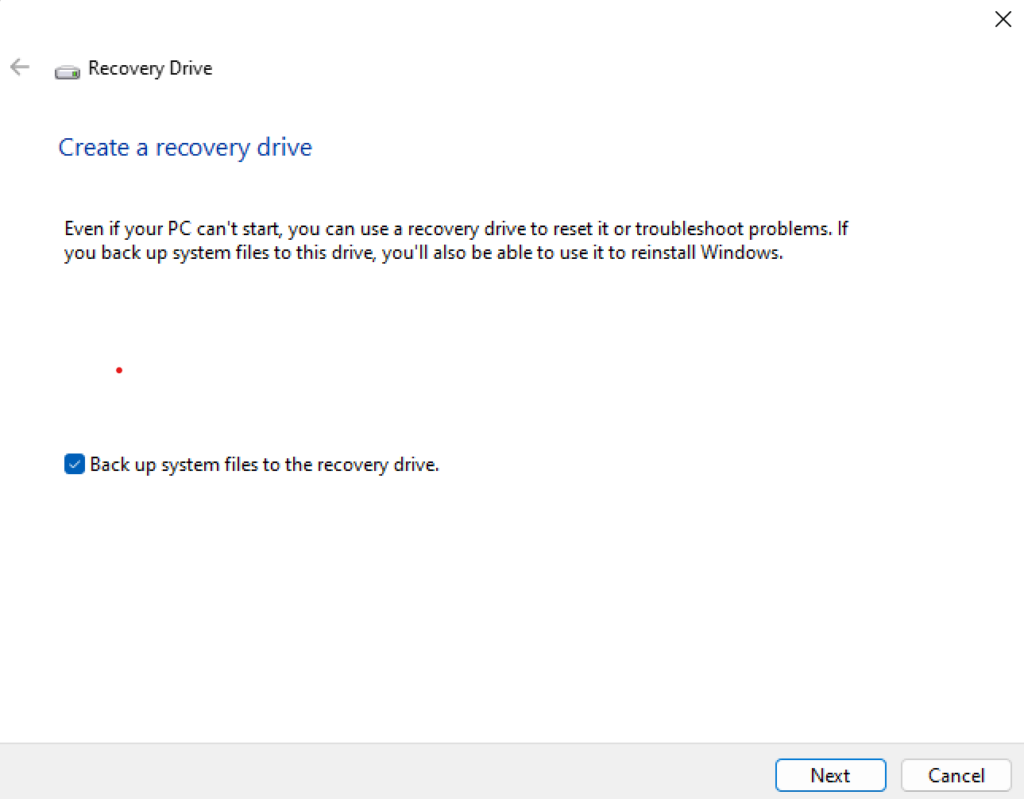
Yes, you can reinstall Windows with the Windows Recovery Drive. The Recovery Drive works similarly to the installation media which allows you to reinstall Windows and troubleshoot the PC. The difference is that it doesn’t include a full-fledged Windows installation setup that will let you change the language, partitions, and more while installing Windows. You also cannot boot into the Windows installation setup using the boot menu like you would with traditional installation media.
To create a Windows Recovery Drive search for “Recovery Drive” in the Windows search bar –> click Next when prompted to create a Recovery drive (ensure that you have checked the backup system files to the recovery drive option) –> attach a USB flash drive and follow the on-screen instructions. Keep in mind the USB flash drive must have a minimum 16GB storage capacity.
2. How long does it take to reinstall Windows?
Windows reinstallation takes anywhere between 20 minutes to 30 minutes to complete the process. It can take longer depending on your PC’s performance.
3. Is there an easier way to reinstall Windows?
Yes, the Windows Reset option works the same way as an installation media in the sense that you can reinstall the complete Windows OS if there are any issues with the existing Windows OS setup — but as explained above, you cannot change the partitions or drives as you would with an installation media.
4. Does reinstalling Windows delete existing data on the hard drive?
Yes, if you’re clean installing Windows, it does wipe the entire local storage. If you’re upgrading Windows using the first method in this article, you can choose to keep your personal files and apps.


")


